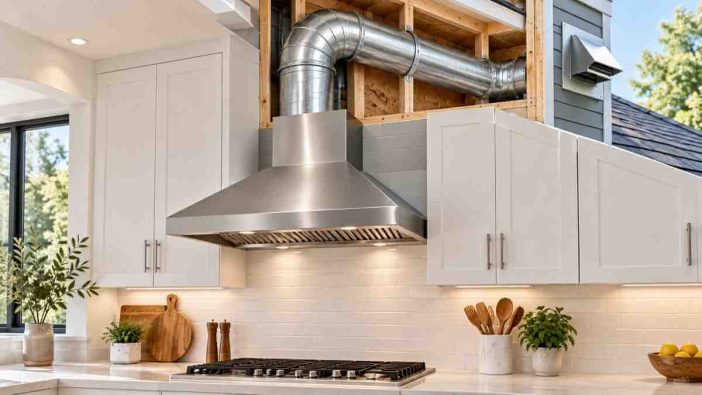
A kitchen renovation can look finished while one of its most consequential decisions remains hidden above the cabinets.
The hood turns on.
The blower sounds powerful.
The lights work.
Yet smoke from a hot pan still drifts toward the room, the highest fan setting sounds harsher than expected, and cooking odors linger longer than they should.
The problem may not be the blower at all.
Behind the finished cabinetry, an eight-inch outlet may have been reduced into an old six-inch duct. A tight elbow may sit directly above the hood. A long route may turn several times before reaching the roof. In older installations, the exhaust may even be passing through corrugated ductwork that adds resistance all the way to the exterior.
Once cabinets, drywall, trim, and a decorative hood enclosure are finished, correcting those choices can become far more disruptive than choosing the duct correctly in the first place.
That is why range hood ductwork should be planned as part of the appliance—not as leftover space for whatever pipe happens to fit.
Quick Answer: Start With the Hood, Not a Generic CFM Chart
There is no universal rule that says every 400-CFM hood needs one particular duct diameter, every 600-CFM hood needs another, and every 900-CFM hood needs a third.
Different range hoods use different blowers, outlet sizes, installation configurations, duct allowances, and performance characteristics.
The practical sequence is:
- Choose or identify the exact range hood.
- Find its required exhaust outlet and approved duct configurations.
- Do not reduce the duct below the manufacturer’s specified size unless the instructions explicitly permit it.
- Use smooth metal ductwork where required.
- Keep the route as short and straight as practical.
- Count elbows, transitions, and termination fittings when checking the manufacturer’s duct-length limits.
- Terminate a ducted cooking exhaust system properly outdoors.
- Check local mechanical/building requirements before construction.
This comes after airflow sizing, not before it. If you have not established the hood capacity yet, start with our range hood CFM sizing guide before designing the exhaust route.
Once the hood is selected, its installation documentation becomes the governing starting point for duct size.
Why Range Hood Duct Size Changes Real-World Performance
A fan does not move air through empty space.
It has to overcome resistance.
Every section of duct, elbow, transition, damper, and exterior cap adds some resistance to the exhaust system. HVAC professionals often describe this resistance in terms of static pressure.
You do not need to calculate fan curves to understand the practical consequence:
the harder the exhaust path is for air to travel through, the less closely installed performance may resemble an ideal rating.
Diameter is one part of that equation.
For round duct, increasing diameter increases cross-sectional area quickly:
| Round duct diameter | Approximate cross-sectional area |
|---|---|
| 6 inches | 28.3 sq. in. |
| 7 inches | 38.5 sq. in. |
| 8 inches | 50.3 sq. in. |
| 10 inches | 78.5 sq. in. |
This table does not mean that any of those sizes has one universal CFM rating.
It simply illustrates why forcing the same volume of air through a smaller passage changes air velocity and resistance.
Actual suitability depends on the hood, blower, duct route, fittings, and manufacturer’s specifications.
Why “6 Inch for X CFM” Can Become Bad Advice
A generic chart can be attractive because it gives a clean answer.
Real installations are not that clean.
One manufacturer may design a particular hood around a six-inch outlet. Another hood with a different blower may require eight inches. High-capacity equipment can require still larger ductwork.
The mistake is treating those examples as universal boundaries.
A homeowner sees an existing six-inch duct, finds a chart saying that six inches is acceptable up to a particular airflow, and buys a hood based on that number.
But the new hood’s own manual may specify an eight-inch outlet.
At that point there are only a few defensible choices:
- install the required duct;
- choose a different hood that is compatible with the existing route;
- or follow another configuration specifically approved by the manufacturer.
The convenient option—necking the outlet down simply because the old pipe is already there—can permanently build a restriction into the system.
Manufacturer documentation outranks a generic internet sizing table.
Smooth Metal, Correct Diameter and a Direct Route
Three principles appear repeatedly in authoritative range-hood guidance.
Match the specified duct size
The duct should not casually be reduced below the hood’s specified outlet.
A reducer may physically connect two sizes, but physical fit is not proof of performance compatibility.
If an eight-inch hood outlet immediately narrows into six-inch ductwork, the rest of the eight-inch route cannot undo that restriction.
This matters especially during replacement projects.
An existing duct is an asset only when it is compatible with the new appliance.
Prefer a smooth interior
Cooking exhaust has to carry moisture, particles, grease aerosols, and heated air through the system.
Smooth metal duct creates a more predictable airflow path than corrugated flexible duct. Flexible ridges create turbulence and additional resistance.
The 2024 International Residential Code also specifies smooth-interior, airtight ducting for domestic cooking exhaust and identifies galvanized steel, stainless steel, or copper as standard duct materials, subject to its stated exceptions.
Do not treat dryer duct as a convenient substitute for a range-hood exhaust route.
Keep the route short and straight
Every unnecessary turn is another resistance point.
The most efficient-looking route on a cabinet drawing is not always the best airflow route, and the most direct exhaust route may need to be planned before cabinets are ordered.
Ideally, the hood and its exterior termination should be considered together.
That could mean:
- a short horizontal route through an exterior wall;
- a vertical route through the roof;
- or another manufacturer-approved arrangement suitable for the building.
The goal is not simply “few feet of pipe.”
The goal is the least restrictive compliant path that works with the selected hood and the building.
Equivalent Length: Why a Short Duct Can Still Be Restrictive
A duct may be only ten physical feet long and still behave like a substantially longer route.
That happens because fittings create resistance.
Manufacturers commonly account for this using equivalent length.
Instead of considering only the straight pipe, the installation calculation assigns resistance allowances to components such as:
- 90-degree elbows;
- 45-degree elbows;
- rectangular-to-round transitions;
- wall caps;
- roof caps;
- dampers;
- and other fittings.
The important detail is that these values are not universal numbers to memorize.
Different installation manuals can use different allowed configurations and equivalent-length values.
So avoid statements such as:
“Every 90-degree elbow always adds exactly X feet.”
That may be true within one particular manufacturer’s calculation method and wrong for another.
Use the table or calculation procedure supplied for the exact hood.
The First Elbow Deserves Special Attention
The duct route often becomes difficult immediately above the hood.
Cabinet shelves, joists, plumbing, wiring, decorative enclosures, and ceiling framing all compete for space.
The installer may be tempted to make a sharp turn almost immediately after the blower outlet.
Before accepting that arrangement, check the hood’s installation instructions.
Some manufacturers specify how transitions or elbows should be arranged around the outlet. Even when a particular distance is not prescribed, a cleaner and less abrupt route generally avoids unnecessary resistance.
This is one reason duct planning should happen before cabinetry locks the route into place.
A cabinet should accommodate the ventilation system.
The ventilation system should not be forced through whatever cavity the cabinet designer happened to leave behind.
Round Versus Rectangular Ductwork
Both round and rectangular metal ductwork appear in residential kitchen ventilation.
Neither shape is automatically correct for every hood.
A manufacturer may permit:
- round duct only;
- rectangular duct only;
- either configuration;
- or a specific transition between them.
For example, a common rectangular format such as 3¼ × 10 inches has a cross-sectional area of about 32.5 square inches.
That number alone does not make it interchangeable with every round duct of a similar area.
Shape changes, fittings, transitions, and the blower’s approved configuration all matter.
The safe decision process is therefore not:
“Which rectangular duct has roughly the same area?”
It is:
“Which rectangular or round configurations does this exact hood permit?”
Transitions should be planned because the appliance allows them—not improvised simply because two pieces can be connected.
A Larger Duct Is Not Permission to Ignore the Hood Manual
Undersized ductwork receives most of the attention, but “bigger is always better” is not a useful design rule either.
Increasing duct size can require:
- larger wall or roof penetrations;
- more cabinet or chase space;
- different caps and fittings;
- structural coordination;
- and more installation cost.
More importantly, the complete system is designed around the appliance.
If the hood manufacturer specifies a particular outlet and approved route, arbitrarily redesigning the duct system based on a general chart is unnecessary.
The objective is not to install the largest pipe that fits.
It is to create a compatible exhaust system.
Where the Range Hood Duct Should Terminate
A ducted range hood is intended to move captured cooking exhaust out of the building.
The 2024 International Residential Code states that domestic cooking exhaust should discharge outdoors through a smooth, airtight duct equipped with a backdraft damper and independent of other exhaust systems.
It also prohibits exhausting mechanical air into spaces such as:
- an attic;
- a soffit;
- a ridge vent;
- or a crawl space.
Local jurisdictions may adopt or amend model codes differently, so the applicable local code still needs to be verified.
But one planning principle is clear:
an attic or ceiling cavity is not a substitute for a proper exterior exhaust termination.
Wall termination
A wall exit can provide an efficient route when an exterior wall is reasonably close to the hood.
The exterior cap must be suitable for the application and positioned in accordance with applicable clearances and manufacturer instructions.
Roof termination
A roof route may be appropriate where the hood is far from an exterior wall or where the kitchen layout favors vertical exhaust.
It requires proper weatherproofing, an appropriate roof cap, and coordination with the structure.
Neither wall nor roof termination is universally superior.
The better option is usually the one that produces the most practical, compliant, and low-resistance route for that building.
The Four-Gate Duct Compatibility Test
Before buying a new range hood, make the proposed installation pass four gates.
| Gate | Verify | Stop the purchase if… |
|---|---|---|
| 1. Appliance | Hood outlet size, approved duct shape and installation orientation | The existing duct is smaller or incompatible and cannot reasonably be changed |
| 2. Route | Length, elbows, transitions and manufacturer limits | The route exceeds permitted configuration or requires excessive restrictions |
| 3. Termination | Smooth metal path, exterior cap, backdraft control and outdoor discharge | The only available route ends inside the building or uses unsuitable ductwork |
| 4. Building | Local code, pressure effects and possible makeup-air implications | High exhaust capacity creates unresolved building or combustion-safety issues |
This framework changes the buying sequence.
Instead of:
buy hood → discover duct problem → improvise
use:
inspect duct → choose compatible hood → verify route → buy hood.
That sequence can prevent an expensive appliance from becoming the wrong appliance for the house.
Three Real-World Retrofit Scenarios
Scenario 1: Existing six-inch metal duct, short exterior-wall route
A kitchen already has smooth six-inch metal duct running a short distance through an exterior wall.
The homeowner is considering a new hood whose installation manual specifically permits six-inch duct for the selected configuration.
There are few fittings, the exterior termination is appropriate, and the route is in good condition.
There is no reason to replace the duct merely because eight-inch duct exists.
The existing system may already be compatible.
Scenario 2: New hood has an eight-inch outlet, old kitchen has six-inch duct
The new appliance looks perfect for the kitchen, but its specified outlet is eight inches while the existing hidden duct is six inches.
Installing a reducer would be convenient.
Convenience is not compatibility.
Before ordering the hood, determine whether the manufacturer explicitly approves a reduced configuration.
If not, either upgrade the exhaust route or choose a hood designed for the existing duct system.
This is exactly the kind of mismatch that is cheapest to discover before purchase.
Scenario 3: There is no permitted route outdoors
An apartment or condominium may have no practical exterior path available because walls, roof penetrations, or common building elements cannot be altered.
Routing a duct into a cabinet void, ceiling cavity, attic, or another indoor space does not create proper exhaust ventilation.
A listed ductless/recirculating hood installed according to its instructions may be the realistic alternative where regulations and building rules allow it.
That system should be understood for what it is: filtration and recirculation, not outdoor exhaust.
How to Inspect Existing Ductwork Before Buying a New Hood
A replacement project should begin with an inventory.
Verify what you can safely access without dismantling the building:
- identify the existing hood’s outlet orientation;
- measure the visible duct dimensions;
- confirm whether it is round or rectangular;
- identify whether the accessible duct is smooth metal or corrugated material;
- trace the route as far as reasonably possible;
- count visible or known elbows and transitions;
- locate the exterior wall or roof termination;
- check whether an exterior backdraft damper appears to operate;
- note any obvious crushed, disconnected, corroded, or grease-loaded sections;
- compare the entire known configuration with the proposed hood’s manual.
An inaccessible route should not be guessed.
If major portions disappear behind finished walls or ceilings and compatibility matters to an expensive replacement, inspection by an appropriate HVAC or building professional may cost far less than discovering the problem after installation.
Older ductwork also deserves attention when the appliance itself is being replaced. Our kitchen appliance lifespan framework explains why hidden supporting components can age differently from the appliance cabinet homeowners see every day.
When Weak Airflow Is Not a Duct-Size Problem
Poor capture does not automatically prove that the duct is too small.
Other causes can produce similar symptoms.
Dirty grease filters
A grease-loaded filter restricts airflow before air even enters the duct.
Check maintenance first.
The year-round kitchen appliance maintenance checklist includes filter cleaning, duct-airflow inspection, and exterior vent checks for range hoods.
A restricted exterior cap
A stuck damper, damaged cap, debris, or another obstruction at the termination can restrict airflow even when the duct itself is correctly sized.
Poor hood coverage
A correctly ducted hood can still let a cooking plume escape when the canopy does not capture the source effectively.
This is a capture problem rather than simply a duct problem.
Incorrect mounting or unsuitable cooking position
Mounting geometry and burner location affect capture. Front-burner emissions can be particularly difficult for shallow hoods to collect.
Blower or installation problems
A fan fault, incorrect configuration, disconnected duct section, or installation error can also produce weak performance.
The useful diagnostic question is therefore:
Where is the restriction or capture failure occurring?
Do not replace ductwork solely because airflow feels weak.
High-CFM Hoods Create a Second Planning Question
A duct may be large enough to exhaust the hood and still leave another issue unresolved:
where will replacement air come from?
A powerful exhaust fan removes indoor air from the house. That changes pressure conditions.
The 2024 International Residential Code contains a makeup-air provision for exhaust systems capable of more than 400 CFM when specified fuel-burning appliances are located within the dwelling’s air barrier and are neither direct-vent nor mechanically drafted.
That wording matters.
It does not mean every range hood above 400 CFM in every house automatically requires the same makeup-air installation.
Building configuration, appliance venting, locally adopted code, manufacturer requirements, and jurisdiction all matter.
EPA also cautions that high-airflow range hoods can contribute to backdrafting of naturally drafting combustion appliances under some conditions.
If a proposed hood enters this territory, the correct response is not an internet workaround.
Have the installation reviewed as a building system.
Range Hood Duct Verification Before Cabinets Are Finalized
Before cabinetry, ceilings, and finishes make the route difficult to change, confirm:
- exact hood model selected;
- hood outlet diameter or rectangular dimensions confirmed;
- approved duct configurations read from the installation manual;
- no unapproved reducer planned;
- smooth metal duct specified;
- full route mapped to outdoors;
- elbows and transitions identified;
- manufacturer’s equivalent-length method checked;
- exterior wall or roof cap selected;
- backdraft-damper arrangement confirmed;
- route is independent of unrelated exhaust systems where required;
- local code requirements reviewed;
- high-airflow pressure and makeup-air implications considered where relevant.
If several of those boxes cannot yet be checked, the project is not ready for the duct to disappear behind finished cabinetry.
Trust and Verification
Range-hood installation requirements vary by appliance and jurisdiction.
For a real project, use three levels of verification:
- The exact appliance installation manual for outlet size, allowable transitions, routing, clearances, and model-specific limitations.
- The code adopted by the local jurisdiction for duct materials, termination, exhaust, permits, and makeup-air requirements.
- A qualified HVAC, mechanical, or building professional when the route is hidden, unusually long, high-capacity, structurally difficult, or capable of affecting combustion appliances.
Online charts are useful for understanding the problem.
They should not override project-specific documentation.
FAQ
Can I use a 6-inch duct for a 600-CFM range hood?
Possibly, but the CFM number alone cannot answer that. Use six-inch duct only when the exact hood’s installation documentation permits it for the proposed configuration. Route length, elbows, fittings, and termination also affect resistance, so another 600-CFM hood may require different ductwork.
Can I reduce an 8-inch range hood outlet to 6 inches?
Do not assume that a reducer is acceptable simply because the fittings connect. Reducing below the specified outlet can restrict performance. Follow the exact hood manufacturer’s approved configurations; if reduction is not permitted, upgrade the duct or choose a hood compatible with the existing route.
Can a range hood duct vent into the attic?
A ducted cooking exhaust should terminate outdoors, not in an attic or other interior building cavity. The 2024 IRC specifically prohibits mechanical exhaust into attics, soffits, ridge vents, and crawl spaces. Always confirm the locally adopted code and the hood manufacturer’s installation instructions.
The Duct Is Part of the Range Hood, Not an Afterthought
Range hood duct size cannot be reduced to a single chart of CFM numbers and pipe diameters.
Diameter matters.
So do duct material, elbows, transitions, equivalent length, termination, hood geometry, blower characteristics, and the building surrounding the system.
The most reliable buying sequence therefore begins before the appliance reaches the wall:
choose the required airflow, identify the exact hood, verify its duct requirements, map the route, confirm exterior termination, and only then finalize the purchase and cabinetry.
That approach turns hidden ductwork from an installation afterthought into part of the appliance decision itself.
It also reflects the larger approach behind our Kitchen Systems, Appliances & Efficiency Hub: a kitchen performs best when appliances, ventilation, plumbing, electrical capacity, maintenance, and the building around them are treated as one connected system.