Are you ready to take your chicken farming to the next level? If you’re looking to maximize your egg production and ensure the comfort and well-being of your flock, then you’ve come to the right place.
In this comprehensive guide, we will delve into the art of constructing a chicken laying cage that will revolutionize your poultry farming operation. Whether you’re a seasoned farmer or just starting out, this article will provide you with expert insights and step-by-step instructions to create the perfect environment for your egg-laying chickens.
Picture this: a picturesque chicken coop filled with happy, healthy hens clucking contentedly as they lay a steady supply of fresh, nutritious eggs. With the right knowledge and tools, you can turn this vision into a reality.
A well-designed chicken laying cage not only promotes a higher egg yield but also ensures the safety and health of your flock. By implementing a few key strategies and following our tried-and-tested techniques, you’ll be well on your way to establishing a thriving egg production system.
The Importance of a Comfortable and Secure Environment
A comfortable and secure environment
Creating a comfortable and secure environment for your chickens is crucial for their overall well-being and productivity. Just like humans, chickens thrive in an environment that provides them with a sense of safety, comfort, and protection. When they feel secure, they can fully express their natural behaviors, resulting in healthier and happier chickens.
To ensure a comfortable and secure environment, there are several factors to consider.
- 1. Physical Structure
First and foremost is the physical structure of the chicken laying cage.
It should be well-built, sturdy, and capable of withstanding various weather conditions and potential predators. Reinforce the structure with quality materials and regularly inspect it for any signs of wear or damage.
- 2. Proper insulation
Proper insulation is another vital aspect to consider when creating a comfortable environment for your chickens. Insulation helps regulate the temperature inside the cage, keeping it warm in colder months and cool during hot summers.
This is particularly important for ensuring optimal egg production, as extreme temperatures can negatively impact laying patterns.
- 3. Ventilation
Ventilation is equally important as it helps maintain air circulation and prevents the buildup of ammonia and other harmful gases. Good airflow ensures fresh air for the chickens to breathe, minimizing the risk of respiratory issues. Install vents or windows strategically to allow for adequate ventilation while still protecting the chickens from drafts.
- 4. Layout and design
Consider the layout and design of the chicken laying cage. Provide ample space for the chickens to move around freely and engage in natural behaviors like scratching, perching, and dust bathing.
Incorporate perches and platforms at varying heights to encourage exercise and provide opportunities for roosting. Include nesting boxes that are comfortable, private, and easily accessible for the hens to lay their eggs.
- 5. Security
To enhance the sense of security, add fencing or wire mesh around the chicken laying cage to protect the chickens from potential predators. Dig the fencing into the ground to prevent burrowing animals from gaining access.
Additionally, install a secure lock on the coop door to ensure that predators cannot open it. Regularly inspect the fencing and door for any signs of weakness or damage.
- 6. Minimize stress
It’s also important to minimize stress factors within the environment. Avoid loud noises, sudden movements, and overcrowding, as these can create stress and negatively impact egg production. Provide adequate space per chicken to reduce aggression and ensure they have enough room to move comfortably.
By creating a comfortable and secure environment for your chickens, you will not only promote their well-being but also encourage optimal egg production. Happy and healthy chickens are more likely to lay eggs consistently, resulting in higher yields for your poultry farming operation.
Remember, a well-designed and secure chicken laying cage is the foundation for a successful and thriving egg business.
Promoting natural egg-laying behavior
Promoting natural egg-laying behavior in your chickens is essential for maximizing their egg production. Chickens have instinctual behaviors and preferences when it comes to laying eggs, and creating an environment that supports these behaviors will encourage them to lay eggs consistently and comfortably.
- 1. Providing appropriate nesting areas
One of the key factors in promoting natural egg-laying behavior is providing appropriate nesting areas. Chickens prefer secluded and private spaces for laying their eggs. Designate specific nesting boxes within the chicken laying cage where the hens can retreat and feel secure.
Ensure that the nesting boxes are clean, dry, and filled with soft bedding materials like straw or wood shavings. The availability of comfortable and suitable nesting areas will encourage your chickens to lay their eggs in the designated boxes rather than in random locations.
- 2. Lighting
Another important aspect is the lighting conditions within the chicken laying cage. Chickens are more likely to lay eggs when they have access to consistent and appropriate lighting. Natural daylight is ideal, but if that’s not feasible, you can supplement with artificial lighting.
Provide at least 14-16 hours of light per day to mimic longer daylight periods, which will stimulate egg production. Keep in mind that sudden changes in lighting conditions can disrupt their natural rhythm, so it’s important to gradually adjust the lighting schedule if needed.
- 3. Maintaining a regular routine and schedule
Maintaining a regular routine and schedule is also beneficial for promoting natural egg-laying behavior. Chickens are creatures of habit, and establishing a consistent daily routine helps them feel secure and comfortable.
Feed them at the same time each day, and try to maintain a regular schedule for cleaning, egg collection, and other tasks within the chicken laying cage. Consistency in their environment and routine will reduce stress and encourage the chickens to follow their natural egg-laying instincts.
- 4. Provide appropriate perches
Provide appropriate perches within the chicken laying cage for the chickens to roost. Chickens naturally prefer to perch at night, and having suitable perching areas promotes their overall comfort and well-being.
Ensure that the perches are wide enough for the chickens to comfortably rest on, with rounded edges to prevent discomfort or injury. Place the perches at varying heights to accommodate different preferences and pecking order dynamics among the flock.
- 5. Providing suitable areas
Encourage natural behaviors like scratching and dust bathing by providing suitable areas within the chicken laying cage. These activities are not only instinctual for chickens but also help keep them physically and mentally stimulated.
Include designated areas with loose soil or sand where the chickens can indulge in dust bathing, and scatter some scratch grains or treats in the bedding for them to scratch and forage. By promoting these natural behaviors, you provide a fulfilling environment for your chickens, leading to better overall health and increased egg production.
Promoting natural egg-laying behavior in your chickens is crucial for maximizing egg production. By providing appropriate nesting areas, suitable lighting conditions, a regular routine, perches for roosting, and opportunities for natural behaviors, you create an environment that supports their instincts and encourages consistent egg laying.
Remember, a happy and comfortable chicken is a productive chicken, and promoting their natural behaviors is the key to achieving optimal results in your poultry farming operation.
Planning Your Chicken Laying Cage
Choosing the right location
Selecting the right location for your chicken laying cage is a crucial step in ensuring the success and productivity of your poultry farming operation. The location should provide a favorable environment for your chickens while considering factors such as accessibility, security, and the surrounding ecosystem.
- 1. Accessibility of the location
First and foremost, consider the accessibility of the location. It should be easily reachable for regular maintenance tasks, egg collection, and providing necessary care to your chickens. Select a spot that is convenient for you to access daily without any major obstacles or inconveniences.
- 2. The security of the location
Next, take into account the security of the location. Choose an area that is well-protected from potential predators such as raccoons, foxes, or stray dogs.
If your region has a high predator population, consider installing additional security measures such as fencing or an electric wire around the perimeter of the chicken laying cage. This will help safeguard your chickens and minimize the risk of predation.
- 3. Surrounding ecosystem
Consider the surrounding ecosystem when choosing the location for your chicken laying cage. Ensure that the area is free from excessive noise, pollution, or other environmental factors that may cause stress to your chickens.
Avoid locating the cage near busy roads, factories, or areas with heavy chemical usage, as these can negatively affect the health and well-being of your flock.
- 4. The terrain and ground conditions
The terrain and ground conditions are also important factors to consider. Choose a location that offers a level and well-drained area for the chicken laying cage. This will help prevent water accumulation and potential flooding during rainy seasons. Adequate drainage is crucial to maintaining a clean and hygienic environment for your chickens.
- 5. Exposure to sunlight
Take into account the exposure to sunlight when selecting the location. Ensure that the chicken laying cage receives sufficient natural daylight throughout the day. Sunlight is not only essential for the chickens’ overall health and well-being but also plays a role in promoting egg production.
Avoid areas that are heavily shaded or obstructed by buildings or trees, as this can negatively impact the natural lighting conditions within the cage.
- 6. The size of the area
Consider the size of the area available for the chicken laying cage. Ensure that it provides enough space to accommodate the number of chickens you plan to keep.
Each chicken should have sufficient room to move around, stretch their wings, and engage in natural behaviors comfortably. Overcrowding can lead to stress, aggression, and reduced egg production, so choose a location that allows for proper spacing.
- 7. Consult with local authorities or adhere
Lastly, consult with local authorities or adhere to any zoning regulations or restrictions that may apply to poultry farming in your area. It’s important to comply with any legal requirements and ensure that your chosen location is suitable for establishing a chicken laying cage.
Selecting the right location for your chicken laying cage is a critical decision that can impact the overall success of your poultry farming venture. Consider factors such as accessibility, security, surrounding ecosystem, terrain, sunlight exposure, and available space.
By choosing a well-suited location, you create a favorable environment for your chickens, which contributes to their health, well-being, and productivity.
Determining the size and capacity
Determining the appropriate size and capacity of your chicken laying cage is essential for providing a comfortable and productive living space for your flock. The size of the cage should take into account the number of chickens you plan to keep, their breed, and their specific needs and behaviors.
- 1. Space
A general rule of thumb is to allow a minimum of 2-3 square feet of space per chicken inside the chicken laying cage. This ensures that each chicken has enough room to move around, stretch their wings, and engage in natural behaviors without feeling cramped or overcrowded. However, keep in mind that certain breeds or larger chickens may require additional space.
- 2. Layout
Consider the layout of the chicken laying cage and incorporate sufficient nesting boxes to accommodate your flock. Each nesting box should measure approximately 12×12 inches and provide enough space for a chicken to comfortably lay its eggs.
A good guideline is to have one nesting box for every 4-5 hens to prevent competition and ensure that each hen can find a suitable spot to lay.
- 3. Factor in the roosting area
Factor in the roosting area within the chicken laying cage. Chickens prefer to perch at night, so provide enough roosting space for the entire flock.
Allow approximately 8-10 inches of roosting space per chicken, ensuring that the perches are wide enough for them to rest comfortably. Place the perches at varying heights to accommodate the natural pecking order dynamics within the flock.
- 4. Consider the future expansion
Consider the future expansion of your poultry farming operation when determining the size and capacity of the chicken laying cage. If you plan to increase your flock in the future, it’s advisable to build a slightly larger cage from the beginning to avoid the need for major modifications or additional construction later on.
- 5. Evaluate the outdoor space
Evaluate the outdoor space available for your chickens to roam and forage. If you have sufficient outdoor space, incorporate a run or an outdoor area attached to the chicken laying cage.
This will provide additional space for your chickens to exercise, engage in natural behaviors, and access fresh grass and insects. The outdoor area should be securely fenced to protect the chickens from predators.
- 6. Consider the height
In addition to size, consider the height of the chicken laying cage. Ensure that the cage is tall enough for you to walk inside comfortably for cleaning and maintenance purposes. A height of at least 6 feet is recommended to allow for easy access and maneuverability.
- 7. Consider your goals and requirements
When determining the capacity of the chicken laying cage, consider your goals and requirements for egg production. If you plan to sell eggs commercially, calculate the expected egg production per day or week based on the number of chickens you have. This will help you determine the appropriate capacity to meet your production goals.
Determining the size and capacity of your chicken laying cage is a crucial step in providing a comfortable and productive environment for your flock. Consider the space requirements per chicken, the number of nesting boxes and roosting areas, the potential for future expansion, outdoor space availability, and the height of the cage.
By carefully assessing these factors, you can ensure that your chickens have enough space to thrive, exhibit natural behaviors, and contribute to optimal egg production.
Materials and Construction
Selecting Durable and Safe Materials
Selecting the right materials for your chicken laying cage is essential for ensuring its durability, safety, and longevity. By choosing high-quality materials, you can create a sturdy and secure environment for your chickens, protecting them from potential hazards and ensuring the long-term success of your poultry farming operation.
- 1. Structural components
When it comes to the structural components of the chicken laying cage, opt for materials that are durable and resistant to wear and tear. One commonly used material is galvanized steel, which offers excellent strength, corrosion resistance, and longevity.
Galvanized steel is specifically treated to withstand harsh weather conditions and resist rusting, making it an ideal choice for the framework, supports, and fencing of the cage.
- 2. The walls and roof
For the walls and roof of the chicken laying cage, consider using sturdy and weather-resistant materials such as PVC-coated wire mesh or durable plastic panels. These materials provide adequate ventilation while protecting your chickens from predators and harsh elements.
Ensure that the mesh or panels have small enough gaps to prevent any potential entry of predators like snakes or rodents.
- 3. Flooring
When it comes to flooring, prioritize materials that are easy to clean, non-porous, and resistant to moisture. Common options include concrete, cement, or high-density polyethylene (HDPE) plastic flooring.
These materials are durable, hygienic, and allow for efficient cleaning and waste management within the cage. Ensure that the flooring is slip-resistant to prevent any potential injuries to your chickens.
- 4. Nesting boxes
For the nesting boxes, choose materials that are comfortable, easy to clean, and provide insulation. Wooden nesting boxes are a popular choice, as they offer insulation properties and a cozy environment for your hens to lay their eggs.
Ensure that the wood is untreated and free from any potentially harmful chemicals that could transfer to the eggs. Regularly inspect and replace any damaged or deteriorating nesting boxes to maintain a clean and safe nesting environment.
- 5. Safety
Consider the safety of your chickens when selecting materials. Avoid using toxic or hazardous substances that could harm your flock. For example, avoid treated woods or paints that may contain harmful chemicals. Opt for natural and non-toxic materials that are safe for your chickens to come into contact with.
- 6.Ease of maintenance and repair
Additionally, consider the ease of maintenance and repair when choosing materials for the chicken laying cage. Select materials that are easy to clean, disinfect, and maintain over time. This will ensure a hygienic environment for your chickens and minimize the risk of diseases or infections.
Selecting durable and safe materials is crucial for the construction of your chicken laying cage. Choose materials such as galvanized steel, PVC-coated wire mesh, durable plastic panels, concrete, or HDPE plastic flooring, and untreated wooden nesting boxes.
Prioritize materials that are resistant to wear and tear, weather conditions, and predators while being safe for your chickens.
By selecting high-quality materials, you can create a secure and long-lasting environment for your flock, promoting their well-being and ensuring the success of your poultry farming venture.
Step-by-Step Construction Process
Step 1: Design and Planning
- Start by designing the layout and dimensions of your chicken laying cage. Consider factors such as the number of chickens, available space, and necessary features like nesting boxes and roosting areas.
- Sketch out the design on paper or use design software to visualize the layout and make any necessary adjustments.
- Plan the placement of access doors, ventilation openings, and other components for easy maintenance and functionality.
Step 2: Gather Materials and Tools
- Make a list of all the materials and tools needed for the construction of the chicken laying cage based on your design.
- Purchase or gather the necessary materials, ensuring they meet the desired quality and safety standards.
- Gather tools such as hammers, nails, screws, saws, wire cutters, and measuring equipment.
Step 3: Prepare the Foundation
- Clear and level the ground where the chicken laying cage will be constructed.
- Mark the boundaries of the cage using stakes and string.
- Excavate the area if necessary and ensure a level base for the cage.
Step 4: Build the Frame
- Start by constructing the frame of the chicken laying cage using the selected materials, such as galvanized steel.
- Follow the dimensions and design plan to assemble the frame, ensuring it is sturdy and well-secured.
- Use appropriate fasteners like screws or bolts to connect the frame components securely.
Step 5: Install Walls and Roof
- Attach the walls and roof materials, such as PVC-coated wire mesh or durable plastic panels, to the frame.
- Ensure that the walls provide adequate ventilation while keeping predators out.
- Securely fasten the materials to the frame, ensuring there are no gaps or loose ends that could pose a safety risk for the chickens.
Step 6: Install Flooring
- Lay the selected flooring material, such as concrete or HDPE plastic, within the chicken laying cage.
- Ensure that the flooring is level, non-porous, and easy to clean.
- Consider adding a slip-resistant surface to prevent any potential injuries to the chickens.
Step 7: Construct Nesting Boxes and Roosting Areas
- Build the nesting boxes using suitable materials like untreated wood.
- Install the nesting boxes within the chicken laying cage, ensuring they are secure, comfortable, and easily accessible for egg collection.
- Create roosting areas using sturdy perches at varying heights, providing enough space for all the chickens to roost comfortably.
Step 8: Install Doors and Access Points
- Add access doors to the chicken laying cage for easy entry and exit.
- Install smaller doors or openings for egg collection, cleaning, and maintenance tasks.
- Ensure that all doors and access points are secure, with appropriate latches or locks to prevent unauthorized entry.
Step 9: Test and Inspect
- Once the construction is complete, thoroughly inspect the chicken laying cage for any potential hazards, loose ends, or structural weaknesses.
- Test the functionality of doors, nesting boxes, and other components to ensure smooth operation.
Step 10: Make Adjustments and Finalize
- Make any necessary adjustments or improvements based on the inspection results.
- Double-check that the chicken laying cage meets your requirements for safety, functionality, and comfort for your chickens.
- Once satisfied with the construction, finalize the cage by adding any finishing touches or additional features as desired.
Constructing a chicken laying cage involves careful planning, gathering materials, building the frame, installing walls, roof, flooring, nesting boxes, and roosting areas, and finalizing the construction with thorough testing and inspection.
By following a step-by-step process and paying attention to details, you can create a durable, safe, and functional environment for your chickens to lay eggs comfortably.
Providing Essential Features
Nesting boxes for egg collection
Nesting boxes are an essential component of a chicken laying cage as they provide a designated area for hens to lay their eggs. Properly designed and installed nesting boxes not only encourage natural egg-laying behavior but also make egg collection easier and more efficient.
Here’s a step-by-step guide on creating nesting boxes for your chicken laying cage.
Step 1: Determine the Number of Nesting Boxes:
- Consider the size of your flock and the number of hens you have.
- Aim for a ratio of one nesting box for every 4-5 hens to prevent overcrowding and competition for nesting spots.
- Calculate the appropriate number of nesting boxes based on the size of your flock.
Step 2: Select Suitable Materials:
- Choose materials that are safe, hygienic, and provide insulation for the nesting boxes.
- Untreated wood, such as plywood or boards, is a popular choice for nesting boxes due to its natural properties and affordability.
- Ensure that the wood is smooth and free from any splinters or rough edges that could potentially harm the hens or damage the eggs.
Step 3: Determine Nesting Box Dimensions:
- Each nesting box should provide enough space for a hen to comfortably enter, turn around, and lay her eggs.
- A common size for a nesting box is approximately 12×12 inches, but you can adjust the dimensions based on the size of your hens and their breeds.
Step 4: Build the Nesting Boxes:
- Cut the wood into appropriate pieces according to your chosen dimensions.
- Assemble the pieces to form a rectangular or square box shape, ensuring the corners are securely joined.
- Use screws or nails to fasten the pieces together, creating a sturdy structure.
Step 5: Add a Slanted Roof:
- Attach a slanted roof to each nesting box to provide protection from droppings and prevent hens from perching on top.
- The roof should be slightly sloped to allow water to run off and prevent pooling or leakage.
- Secure the roof to the nesting box structure, ensuring it is firmly attached.
Step 6: Install Nesting Boxes in the Chicken Laying Cage:
- Determine the optimal location within the cage for the nesting boxes.
- Place the nesting boxes at a suitable height, ensuring they are easily accessible for the hens.
- Securely attach the nesting boxes to the walls or framework of the chicken laying cage to prevent them from shifting or falling.
Step 7: Provide Bedding Material:
- Line the bottom of each nesting box with suitable bedding material, such as straw, wood shavings, or nesting pads.
- The bedding material provides cushioning and helps keep the eggs clean and protected.
Step 8: Monitor and Maintain the Nesting Boxes:
- Regularly check the nesting boxes for cleanliness and remove any soiled bedding or debris.
- Inspect the boxes for any signs of damage or wear, and make necessary repairs or replacements as needed.
- Ensure that the nesting boxes are kept clean and inviting for the hens to encourage regular egg-laying behavior.
By following these steps, you can create functional and comfortable nesting boxes for your chicken laying cage, promoting natural egg-laying behavior and facilitating easy egg collection. Regular maintenance and cleanliness of the nesting boxes will contribute to the health and productivity of your flock.
Proper ventilation and lighting
Proper ventilation and lighting are crucial elements in creating a healthy and productive environment for your chickens within the laying cage.
Adequate ventilation ensures fresh air circulation, controls humidity levels, and minimizes the risk of respiratory issues, while appropriate lighting promotes egg production and maintains the well-being of your flock.
Here are some guidelines for achieving optimal ventilation and lighting in your chicken laying cage.
Step 1: Ventilation:
- Position the laying cage in an area with good air movement to facilitate natural ventilation.
- Incorporate openings, such as windows or vents, to allow fresh air to enter and stale air to exit the cage.
- Ensure that the ventilation openings are positioned higher than the roosting and nesting areas to prevent drafts and maintain proper airflow.
Step 2: Natural Ventilation:
- Take advantage of natural airflow by placing the cage in a location where prevailing winds can naturally circulate through the space.
- Orient the openings to maximize cross-ventilation, allowing fresh air to flow from one side of the cage to the other.
- Adjust the size and number of openings based on the size of your flock and the climate conditions in your area.
Step 3: Supplemental Ventilation:
- In regions with hot and humid climates or during periods of extreme weather, consider installing additional mechanical ventilation systems.
- Exhaust fans, vents, or air circulation fans can be utilized to enhance airflow and maintain optimal temperature and humidity levels within the laying cage.
- Consult with a ventilation expert or agricultural engineer to determine the most suitable system for your specific needs.
Step 4: Lighting:
- Provide appropriate lighting conditions to promote egg production and maintain the circadian rhythm of your chickens.
- Install artificial lighting sources, such as LED bulbs or fluorescent tubes, to supplement natural daylight.
- Ensure a minimum of 14-16 hours of light per day to stimulate egg-laying behavior.
- Use timers or automated systems to regulate the lighting schedule consistently.
Step 5: Light Placement:
- Position the lighting fixtures evenly throughout the laying cage to ensure uniform light distribution.
- Place the fixtures above the roosting and nesting areas to encourage chickens to utilize these spaces during the designated laying hours.
- Avoid direct exposure of the lighting source to the chickens’ eyes, as this can cause stress or discomfort.
Step 6: Light Intensity:
- Select lighting sources with appropriate intensity to mimic natural daylight conditions.
- Aim for a light intensity of approximately 10-20 lux (1-2 foot-candles) at the chicken’s eye level.
- Regularly monitor and adjust the lighting levels based on the age, breed, and specific requirements of your flock.
Step 7: Lighting Maintenance:
- Regularly inspect and clean the lighting fixtures to ensure they are free from dust, debris, or damage.
- Replace any malfunctioning bulbs or fixtures promptly to maintain consistent lighting conditions.
- Periodically review and adjust the lighting schedule based on seasonal changes or flock requirements.
By following these guidelines, you can establish proper ventilation and lighting within your chicken laying cage, creating an environment that promotes respiratory health, egg production, and overall well-being for your flock.
Regular monitoring and maintenance of ventilation and lighting systems are essential to ensure their effectiveness and long-term benefits.
Maintaining Hygiene and Cleanliness
Regular cleaning and waste management
Regular cleaning and effective waste management are essential for maintaining a clean, healthy, and odor-free environment in your chicken laying cage. Proper waste management helps prevent the spread of diseases, reduces fly and pest infestations, and promotes the overall well-being of your flock.
Here are some important steps to follow for regular cleaning and waste management in your chicken laying cage.
Step 1: Daily Spot Cleaning:
- Perform daily spot cleaning to remove any visible droppings, spilled feed, or soiled bedding from the cage.
- Use a shovel, rake, or scoop to collect the waste and dispose of it in a designated composting area or appropriate waste disposal system.
- Regularly check and clean the nesting boxes to remove any soiled bedding or broken eggs.
Step 2: Weekly Deep Cleaning:
- Schedule a weekly deep cleaning session to thoroughly clean and disinfect the chicken laying cage.
- Remove all equipment, such as feeders, waterers, and perches, from the cage for cleaning separately.
- Use a broom or brush to sweep out any accumulated dirt, debris, or cobwebs from the cage walls, floor, and corners.
Step 3: Water and Feeders Cleaning:
- Clean and sanitize the waterers and feeders regularly to prevent bacterial growth and contamination.
- Disassemble the waterers and feeders and wash them with hot, soapy water.
- Rinse thoroughly and allow them to air dry before refilling with fresh water and feed.
Step 4: Disinfection:
- After removing the dirt and debris, disinfect the chicken laying cage using a suitable poultry-safe disinfectant.
- Follow the manufacturer’s instructions for dilution and application.
- Pay extra attention to areas prone to bacteria buildup, such as roosting bars, nesting boxes, and high-traffic areas.
Step 5: Bedding Replacement:
- Regularly replace the bedding material in the nesting boxes to maintain cleanliness and hygiene.
- Dispose of the used bedding in the compost or appropriate waste disposal system.
- Add fresh bedding material to provide a clean and comfortable nesting area for the hens.
Step 6: Waste Management:
- Implement an efficient waste management system for proper disposal and composting of chicken waste.
- Set up a designated composting area away from the chicken laying cage.
- Compost the chicken manure along with other organic materials, ensuring proper composting techniques to generate nutrient-rich compost for gardening or agricultural use.
Step 7: Pest Control:
- Regularly monitor and address any pest infestations, such as flies, rodents, or mites, within and around the chicken laying cage.
- Use appropriate pest control methods, such as traps, repellents, or natural predators, to minimize pest populations.
- Keep the area around the cage clean and free from standing water or potential pest breeding sites.
By following these steps for regular cleaning and waste management, you can ensure a clean and healthy environment for your chickens in the laying cage. Regular maintenance and proper waste disposal not only promote the well-being of your flock but also contribute to the overall cleanliness and productivity of the chicken laying operation.
Preventing disease and pests
Preventing disease and pest infestations is crucial for maintaining the health and productivity of your chickens in the laying cage. Disease outbreaks and pest infestations can lead to decreased egg production, poor overall health, and even mortality within the flock. Implementing effective prevention measures is key to safeguarding your chickens.
Here are some important steps to prevent disease and pests in your chicken laying cage.
Step 1: Biosecurity Practices:
- Establish strict biosecurity practices to minimize the introduction and spread of diseases.
- Limit access to the chicken laying cage to authorized personnel only.
- Practice good hygiene by thoroughly washing hands and using disinfectants before entering the cage area.
Step 2: Quarantine New Birds:
- Quarantine new birds before introducing them to the existing flock.
- Keep the newly acquired chickens separate from the main flock for a period of at least 2-3 weeks.
- Observe them closely for signs of illness or disease during this quarantine period.
Step 3: Vaccinations:
- Consult with a veterinarian to develop a vaccination program suitable for your specific region and the prevalent diseases.
- Administer vaccinations to your chickens as per the recommended schedule.
- Vaccinations can help prevent common diseases and reduce the risk of outbreaks.
Step 4: Proper Nutrition:
- Provide a balanced and nutritious diet to strengthen the immune system of your chickens.
- Ensure access to clean and fresh water at all times.
- Consult with a poultry nutrition expert to formulate a diet appropriate for the age, breed, and specific requirements of your flock.
Step 5: Cleanliness and Sanitation:
- Maintain a clean and sanitary environment within the chicken laying cage.
- Regularly clean and disinfect the cage, nesting boxes, feeders, and waterers.
- Remove any spilled feed, soiled bedding, or debris that can attract pests or promote disease transmission.
Step 6: Pest Control Measures:
- Implement effective pest control measures to prevent infestations of flies, rodents, mites, and other pests.
- Keep the area surrounding the chicken laying cage clean and free from potential pest breeding sites.
- Use pest repellents, traps, or natural predators to control pest populations.
Step 7: Regular Health Monitoring:
- Monitor the health of your chickens regularly.
- Watch for signs of illness, such as decreased egg production, lethargy, abnormal droppings, or respiratory issues.
- If you notice any concerning symptoms, consult with a veterinarian promptly for diagnosis and appropriate treatment.
Step 8: Education and Training:
- Stay informed about common poultry diseases and pests through educational resources, workshops, or seminars.
- Continuously educate yourself and your staff on best practices for disease prevention and pest control.
- Train your staff on proper hygiene practices and the importance of biosecurity measures.
By following these preventive measures, you can significantly reduce the risk of disease outbreaks and pest infestations in your chicken laying cage. A proactive approach to disease prevention and pest control will ensure the long-term health and productivity of your flock.
Ensuring Chicken Comfort and Well-being
Sufficient space and perches
Providing sufficient space and perches in your chicken laying cage is essential for the well-being and comfort of your flock. Adequate space allows for natural movement, exercise, and reduces the risk of behavioral problems, while perches provide chickens with a place to rest and roost.
Here are some guidelines to ensure sufficient space and perches in your chicken laying cage.
Step 1: Cage Size:
- Determine the appropriate size of the laying cage based on the number of chickens you have and their breed.
- A general guideline is to provide a minimum of 1.5-2 square feet of floor space per chicken in the cage.
- This space allocation allows chickens to move around comfortably, stretch their wings, and exhibit natural behaviors.
Step 2: Perch Placement and Size:
- Install perches in the laying cage at varying heights to accommodate the different preferences of your chickens.
- Use sturdy and appropriately sized materials, such as wooden poles or branches, as perches.
- Aim for a diameter of around 1.5-2 inches for the perches, providing a comfortable grip for the chickens’ feet.
Step 3: Perch Quantity:
- Provide enough perches to accommodate all the chickens comfortably.
- Allocate at least 6-8 inches of perch space per bird to ensure they have ample room to roost and rest.
- Avoid overcrowding the perches, as this may lead to unnecessary competition and stress among the chickens.
Step 4: Perch Placement:
- Position the perches away from the feeding and watering areas to prevent contamination and keep the roosting area clean.
- Place the perches at a sufficient height from the ground to give the chickens a sense of security and protection from predators.
- Allow adequate space between perches to avoid overcrowding and ensure easy movement.
Step 5: Additional Roosting Options:
- Consider providing additional roosting options, such as elevated platforms or ladder-style perches.
- These additional features can provide variety and accommodate chickens with different preferences for roosting.
Step 6: Monitor and Adjust:
- Regularly monitor the usage of perches and the overall space within the laying cage.
- Observe the behavior of the chickens to ensure they have enough space and access to perches.
- If necessary, make adjustments by adding more perches or increasing the overall space to meet the needs of your flock.
By following these guidelines, you can provide sufficient space and perches in your chicken laying cage, allowing your chickens to move freely, rest comfortably, and exhibit natural behaviors. A well-designed and spacious environment contributes to the overall health, welfare, and productivity of your flock.
Adequate feeding and watering systems
Providing adequate feeding and watering systems in your chicken laying cage is essential for ensuring the proper nutrition and hydration of your flock. A well-designed feeding and watering setup promotes efficient feeding habits, reduces wastage, and keeps the chickens healthy and productive.
Here are some guidelines to help you establish adequate feeding and watering systems in your chicken laying cage.
Step 1: Feeders:
- Choose feeders that are appropriate for the size and type of feed you are providing to your chickens.
- Consider using gravity-feed or treadle feeders that limit access to the feed, preventing spillage and contamination.
- Position the feeders at an appropriate height that is accessible to the chickens but prevents them from perching on top and soiling the feed.
Step 2: Waterers:
- Select waterers that can accommodate the number of chickens in your flock.
- Use clean and durable waterers that are easy to refill and maintain.
- Place the waterers at a convenient height for the chickens to access without contaminating the water with bedding or droppings.
Step 3: Placement and Accessibility:
- Position the feeders and waterers in a designated area within the laying cage, away from nesting boxes and perches.
- Ensure easy access for the chickens without overcrowding the feeding and watering area.
- Provide enough feeding and watering stations to prevent competition and allow all chickens to eat and drink comfortably.
Step 4: Regular Cleaning and Refilling:
- Clean the feeders and waterers regularly to prevent bacterial growth and contamination.
- Remove any leftover feed or debris from the feeders and rinse them with clean water.
- Refill the feeders and waterers daily to ensure a continuous supply of fresh food and water.
Step 5: Observation and Adjustments:
- Observe the feeding and drinking behavior of your chickens to ensure they have easy access to feed and water.
- Monitor the consumption patterns and adjust the amount of feed accordingly to prevent wastage or inadequate nutrition.
- Check for any signs of feed or water spillage and make necessary adjustments to minimize wastage.
Step 6: Nutritional Balance:
- Consult with a poultry nutrition expert to ensure your chickens receive a balanced and appropriate diet.
- Follow recommended feeding guidelines based on the age, breed, and specific nutritional needs of your flock.
- Provide access to grit and calcium supplements to support eggshell formation and overall health.
By following these guidelines, you can establish adequate feeding and watering systems in your chicken laying cage, ensuring that your flock receives proper nutrition and hydration. Regular cleaning, observation, and adjustments are key to maintaining the efficiency and effectiveness of the feeding and watering setup.
Feed and Nutrition for Optimal Egg Production
Choosing the right feed
Choosing the right feed for your chickens in the laying cage is crucial for their overall health, egg production, and quality. A well-balanced and nutritionally appropriate diet provides the essential nutrients needed to support their growth, egg-laying capacity, and overall well-being.
Here are some guidelines to help you choose the right feed for your chickens in the laying cage.
Step 1: Understand Nutritional Requirements:
- Familiarize yourself with the specific nutritional requirements of laying hens.
- Laying hens require a feed that is high in protein, calcium, and other essential vitamins and minerals.
- Ensure the feed you choose meets these requirements and provides a balanced diet for your flock.
Step 2: Commercial Layer Feed:
- Consider using commercially formulated layer feed specifically designed for laying hens.
- These feeds are specially formulated to meet the nutritional needs of laying hens at different stages of egg production.
- Look for layer feeds with a protein content of around 16-18% and a calcium content of approximately 3.5-4%.
Step 3: Ingredients and Quality:
- Check the ingredients list on the feed label to ensure high-quality ingredients are used.
- Look for feeds that contain a variety of grains, seeds, and protein sources.
- Avoid feeds that contain excessive amounts of fillers or low-quality ingredients.
Step 4: Additional Supplements:
- Assess the specific needs of your flock and consider additional supplements, if necessary.
- Depending on the quality of your feed and the health of your chickens, you may need to provide additional calcium or other supplements.
- Consult with a poultry nutrition expert or veterinarian for guidance on the appropriate supplementation for your flock.
Step 5: Feed Presentation:
- Choose the appropriate feed presentation for your chickens.
- Pellets, crumbles, or mash are common forms of feed.
- Consider factors such as feed wastage, ease of consumption, and bird preference when selecting the feed presentation.
Step 6: Transitioning:
- If you are transitioning to a new feed, do it gradually over a period of several days.
- Mix the new feed with the old feed, gradually increasing the proportion of the new feed over time.
- This gradual transition helps prevent digestive upsets and ensures a smooth transition to the new feed.
Step 7: Regular Evaluation:
- Regularly evaluate the performance of your flock, including egg production, egg quality, and overall health.
- Monitor the body condition of the chickens to ensure they are receiving the right amount and quality of feed.
- Make adjustments to the feed if necessary, consulting with experts if needed.
By following these guidelines, you can choose the right feed for your chickens in the laying cage, promoting their health, productivity, and overall well-being. A well-balanced diet tailored to the nutritional needs of laying hens is essential for optimal egg production and the overall success of your chicken laying operation.
Supplementing with essential nutrients
Supplementing with essential nutrients in your chicken laying cage is important to ensure your flock receives the necessary vitamins, minerals, and other nutrients for optimal health, egg production, and overall performance.
While a balanced commercial feed provides a majority of the required nutrients, there are certain situations where additional supplementation may be beneficial.
Here are some guidelines for supplementing with essential nutrients in your chicken laying cage.
Step 1: Assessing Nutritional Needs:
- Regularly assess the nutritional needs of your flock by observing their overall health, egg production, and condition.
- Consider factors such as the quality of the feed, environmental conditions, and individual bird requirements.
- Consult with a poultry nutrition expert or veterinarian to determine if any specific nutrients need to be supplemented.
Step 2: Calcium Supplementation:
- Calcium is vital for eggshell formation in laying hens.
- Provide a separate calcium source, such as crushed oyster shells or commercial calcium supplements, in a separate feeder or container.
- Laying hens can consume calcium as needed to support eggshell quality.
Step 3: Omega-3 Fatty Acids:
- Omega-3 fatty acids are known to enhance the nutritional quality of eggs.
- Consider supplementing the feed with flaxseeds, fish oil, or other omega-3 sources to increase the omega-3 content in eggs.
- Follow recommended guidelines for supplementation to achieve desired levels.
Step 4: Vitamin and Mineral Supplements:
- Evaluate the vitamin and mineral content of the commercial feed you are using.
- If deficiencies are suspected or identified, consult with a poultry nutrition expert or veterinarian to determine the appropriate vitamin and mineral supplements to add.
- Avoid excessive supplementation, as it can lead to imbalances and potential health issues.
Step 5: Herbal and Natural Supplements:
- Some poultry keepers opt for herbal or natural supplements to support overall health and well-being.
- While the effectiveness of such supplements may vary, consult with experts and research reputable sources before introducing them to the flock.
- Be cautious with the use of herbal supplements, as some plants can be toxic to chickens.
Step 6: Water-Soluble Supplements:
- Water-soluble supplements can be administered via drinking water, providing an easy way to supplement the flock.
- Examples include water-soluble vitamins or electrolytes.
- Follow the manufacturer’s instructions for proper dosages and administration.
Step 7: Regular Monitoring and Adjustments:
- Continuously monitor the flock’s performance, including egg production, egg quality, and overall health.
- Regularly assess the effectiveness of the supplements in meeting the nutritional needs of the chickens.
- Make adjustments to the supplementation regimen as necessary, consulting with experts or veterinarians.
By following these guidelines, you can supplement your chicken laying cage with essential nutrients to ensure your flock’s optimal health and performance. Remember to monitor the flock’s response and make adjustments as needed to maintain a balanced and nutritious diet.
Protecting Your Flock from Predators
Securing the chicken laying cage
Ensuring the security of your chicken laying cage is crucial for the safety and well-being of your flock. A properly secured cage protects the chickens from predators, prevents escapes, and creates a secure environment for them to thrive and lay eggs.
Here are some guidelines for securing your chicken laying cage.
Step 1: Perimeter Fencing:
- Install a sturdy and secure perimeter fence around the chicken laying area.
- Choose fencing materials that are predator-proof, such as hardware cloth or welded wire mesh with small openings.
- Bury the bottom of the fence several inches into the ground to prevent predators from digging underneath.
Step 2: Reinforced Gates:
- Use strong and reinforced gates to allow access to the chicken laying area.
- Ensure that gates are properly secured with latches or locks to prevent unauthorized entry.
- Regularly inspect the gates for any signs of damage or wear and make repairs promptly.
Step 3: Roof and Overhead Protection:
- Consider adding a roof or overhead netting to the chicken laying cage.
- This provides protection from aerial predators, such as birds of prey.
- Make sure the roof or netting is securely attached and doesn’t have any gaps or openings.
Step 4: Predator Prevention Measures:
- Identify and address potential entry points for predators, such as gaps, holes, or weak spots in the cage structure.
- Install predator-proof hardware cloth or wire mesh over openings, vents, and windows.
- Reinforce vulnerable areas, such as the base of the cage or corners, to prevent predators from accessing the chickens.
Step 5: Nighttime Security:
- Close and secure the chicken laying cage at night to protect the chickens from nocturnal predators.
- Lock the doors and ensure that all access points are properly secured.
- Use additional measures such as motion-activated lights or alarms to deter predators.
Step 6: Regular Inspections:
- Conduct regular inspections of the chicken laying cage to identify and address any potential security risks.
- Look for signs of damage, wear, or weakness in the fencing, gates, and other structures.
- Promptly repair or reinforce any compromised areas to maintain the integrity of the cage.
Step 7: Vigilance and Monitoring:
- Be vigilant and observant of any signs of predator activity around the chicken laying area.
- Monitor the behavior and well-being of your flock regularly.
- If you notice any unusual behavior or signs of stress, investigate and take necessary measures to ensure their safety.
By following these guidelines, you can secure your chicken laying cage, providing a safe and protected environment for your flock. A secure cage not only prevents predator attacks but also gives you peace of mind knowing that your chickens are well-protected.
Installing deterrents and alarms
Installing deterrents and alarms in your chicken laying cage is an effective way to enhance the security measures and protect your flock from potential threats. These additional measures can help deter predators, alert you to any intrusion attempts, and provide an extra layer of protection for your chickens.
Here are some guidelines for installing deterrents and alarms in your chicken laying cage.
Step 1: Motion-Activated Lights:
- Install motion-activated lights around the perimeter of the chicken laying cage.
- These lights are triggered by movement and can startle or deter nocturnal predators.
- Place them strategically to cover the entire area and ensure maximum visibility.
Step 2: Predatory Bird Deterrents:
- Use visual deterrents such as reflective tape, shiny objects, or scarecrows to deter predatory birds.
- Hang these deterrents near the chicken laying area to create a visual deterrent that scares off birds of prey.
- Regularly move and change the position of the deterrents to maintain their effectiveness.
Step 3: Electric Fencing:
- Consider installing electric fencing as an added deterrent for predators.
- Electric fencing delivers a harmless shock to deter predators from attempting to breach the fence.
- Follow the manufacturer’s instructions for proper installation and maintenance.
Step 4: Intruder Alarms:
- Install intruder alarms or motion sensors in strategic locations around the chicken laying cage.
- These alarms can detect unauthorized entry and trigger an audible alarm or send a notification to your mobile device.
- Ensure that the alarms are properly installed, tested, and functioning correctly.
Step 5: Surveillance Cameras:
- Set up surveillance cameras to monitor the chicken laying area.
- Place cameras at vantage points to capture clear footage of any potential intruders.
- Connect the cameras to a recording device or a cloud-based storage system for review and evidence purposes.
Step 6: Regular Maintenance:
- Conduct regular maintenance checks on the installed deterrents and alarms.
- Ensure that the lights, deterrents, electric fencing, and alarms are in working order.
- Replace batteries, adjust settings, or make repairs as needed to maintain their effectiveness.
Step 7: Signage:
- Display warning signs or notices indicating the presence of security measures.
- Signs such as “Protected Area” or “24-Hour Surveillance” can deter potential intruders.
- Place the signs at visible locations near the chicken laying cage.
By following these guidelines and installing deterrents and alarms, you can significantly enhance the security of your chicken laying cage. These measures act as effective deterrents, discourage predators, and provide you with early warning signs of any intrusion attempts.
Remember to regularly inspect and maintain these security measures to ensure their continued effectiveness in safeguarding your flock.
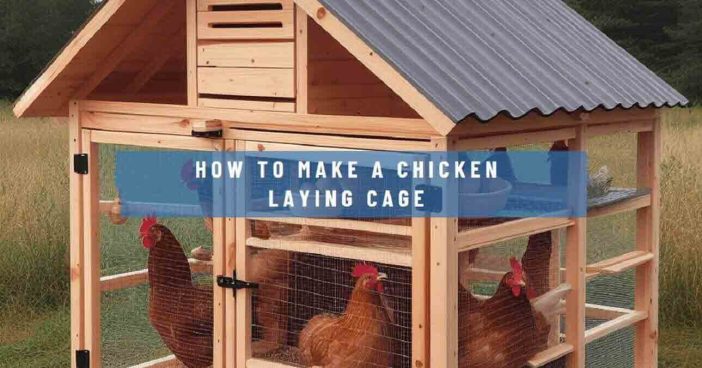
How To Make A Chicken Laying Cage with battery method
How To Make A Chicken Laying Cage should pay attention to various factors. This is so that the chickens can be productive produce quality eggs. Moreover, the use of chicken cage is certainly also effective and makes feeding and taking eggs more easily.
The chicken laying cage type has a variety of variations. To create a simple chicken laying cage, you can follow how to create a battery chicken cage. This type of chicken cage is the easiest type of cage made.
How to make chicken laying cage can be done by preparing all the materials and follow the steps carefully. This type of battery layer chicken cage can be arranged a row and two or more levels.
Chicken Laying Cage Design
The first thing to do to make a battery cage is to determine the design of the cage, here we use a chicken cage design such as prism stage where the chicken dirt so directly falls under the cage, in this case it makes it easy for farmers to clean the cage periodically and maintain the health and hygiene of chickens.
In making a three-storey cage, make sure the position of each level makes the difference shifts to the side so that chicken dirt does not befall the chickens underneath.
Then, the thing that farmers should consider in building a cage is an ideal height range of approximately 1 meter to 2 meters, it aims to control air quality and reduce ammonia in chicken manure.
This kind of design certainly has advantages and disadvantages, here we review one by one:
Advantages
- The air quality is excellent, this makes chicken laying very comfortably.
- Can be clean the cage easily
- Control of feed and drink
- Facilitate the production of eggs
- Chicken is always in clean condition.
Disadvantages
- Possibility of chicken paralysis because put before time
- Delays in cage cleaning often make flies arrive and chickens are threatened with disease attacks.
Preparing tools and materials

The next way How To Make A Chicken Laying Cage is to prepare the necessary tools and materials. In making this chicken laying cage, you certainly need a variety of crafting equipment. For example, a chainsaw to cut wood or bamboo beams, hammers, gauges such as meters and pencils, sandpaper, and nails. In addition, it is necessary to also prepare gloves to be safe.
After having all these equipments, the next way to make chicken cage is to prepare the material. You need to make the wooden beams in 2×4 cm and bamboo to taste.
In addition, you also have to provide good material for the roof. It is better to use materials that are waterproof and hot, for example, zinc, tile or palm fiber. For the wall, you can use woven bamboo or plywood. This material can be used also for a partition between the cage.
Chicken laying cage Size
In this case determining the size is important to be comfortable from the livestock itself. Adjusting the size of the case adjusts to your land condition or environment. It is also the advantage of making the type of battery cage model.
By making a adjust of the size conditions which can affect the productivity and health of the chicken laying themselves. When creating a container size that is not adjusted and excessive which can affect the cost burden to be incurred.
Basically, the shape of this cage is constructed lengthwise, which is given a small of the partition. For its length can adjust to the condition of land and efficiently of the cage itself. In this small partition, you can make it with a size, width of 40 cm, front height 37 cm height back 30 cm and length 40 cm.
In the making, this type of cage has very open ventilation, both on the front, back and top. At the bottom or the ground should be made with a certain tilt so that the egg can roll towards the front. On the floor to be made somewhat stretchable as the egg does not fall down and dirt directly falling down.
Make a Framework
After creating the design, it’s time to create a skeleton as a way to create the next chicken laying cage. First of all, you have to cut wood block as needed.
Make a frame with a height of at least 10 cm, unless you want to create a cage without a floor. The number of feet is certainly adjusted to the cage length. So, if the cage is made quite long, automatically the number of pairs of feet needed.
The height of the skeleton you make at this stage also includes space to accommodate chicken manure, which is especially true for how to create a level chicken cage with a battery type.
In this installation has also been calculated space for roof mounting. As tips for making frames, for wooden blocks installed in the cage length, position the shortest size below, the goal of making the wood less curved. For example, if you are using 2x4cm of wood, then the 2cm section is below.
Making a cage Floor
The next step How To Make A Chicken Laying Cage is make the floor. Because it serves as a support, it is recommended to choose a sturdy material, such as bamboo. You can use small or medium-sized bamboo without being split.
Use sandpaper to smooth the bamboo surface before being fitted to the frame, making it safe and not injuring the chicken legs. In making the floor, give a little cavity or do not arrange the bamboo too tightly. The goal is to get chicken droppings to fall down more easily.
Besides being able to fertilize the soil around the cage, you can also be easier when cleaning the cage, because the chicken dung does not accumulate on the floor. To make the floor more sturdy, you can install wooden blocks in the middle of the bamboo floor.
Installing the Wall
The next step How To Make A Chicken Laying Cage is to install the wall. You can choose the best material for the wall, whether using bamboo or wire. If you have a limited number of bamboos, use wire ram as an alternative.
For example, if using bamboo, start by splitting the bamboo into sections with a width of 2-3 cm. Cut with lengths to fit the cage size, sandpaper and nail to the frame. For the front wall, do not forget to make doors. Materials for the door can also use a wire or bamboo, while the frame can be made of wood.
Installing the roof
The next step How To Make A Chicken Laying Cage is to install a sloped roof on either side. Make the front of the position higher than the back. Don’t forget to take the width and length of the roof.
It is not advisable to make the roof of the same size as the frame, because certainly can not protect the cage to the maximum, especially when it rains. So try each side of the roof made longer, at least 30 cm from the frame.
Make feed and drink place
For the feed place and the drinking place made multilevel. The place of the feed is below, while the drinking place is at the top
Place the feed you can use wood or from pipes. Easier to be made from pipes because the shape is curved and easily obtained in the building shop. Drinking tube can use the pipe as long as it does not leak.
FAQs (Frequently Asked Questions) about Chicken Laying Cages
How many chickens can I keep in a laying cage?
The number of chickens you can keep in a laying cage depends on the size and capacity of the cage. As a general guideline, provide at least 1.5 to 2 square feet of space per chicken. This means a 4’x4′ cage can accommodate around 8 to 16 chickens.
However, it’s important to consider the breed of chickens, their size, and their comfort when determining the appropriate stocking density.
How often should I clean the chicken laying cage?
Regular cleaning is essential for maintaining a hygienic environment for your chickens. Ideally, clean the laying cage on a weekly basis. Remove soiled bedding, droppings, and any other debris.
Disinfect the cage using poultry-safe disinfectants to prevent the buildup of harmful bacteria and parasites. Regular cleaning helps reduce the risk of disease and promotes the overall health of your flock.
Can I use a chicken laying cage for other poultry, such as ducks or geese?
Chicken laying cages are specifically designed for chickens and may not be suitable for other poultry species such as ducks or geese. Different poultry species have varying needs and behaviors.
Ducks and geese, for example, require access to water for swimming and different housing arrangements. It’s best to provide appropriate housing and accommodations specific to the needs of each poultry species.
How do I prevent egg breakage in the nesting boxes?
To prevent egg breakage in the nesting boxes, ensure that the nesting boxes are padded with soft bedding material such as straw or shavings. This helps cushion the eggs and prevent them from cracking.
Regularly inspect the nesting boxes for any sharp or protruding objects that could damage the eggs. Additionally, provide enough nesting boxes to minimize competition and allow each chicken to have a designated space to lay their eggs comfortably.
Can I use natural or homemade remedies to control pests in the chicken laying cage?
While natural or homemade remedies may have some effect in controlling pests, it’s important to exercise caution. Some natural substances can be toxic to chickens or interfere with their egg production.
It’s recommended to consult with a poultry expert or veterinarian before using any natural or homemade remedies. They can provide guidance on safe and effective methods to control pests in the chicken laying cage without compromising the health of your flock.
How long does it take for chickens to start laying eggs in the laying cage?
The age at which chickens start laying eggs can vary depending on the breed and individual factors. Generally, most laying breeds start laying eggs between 4 to 6 months of age.
However, it’s important to note that factors such as nutrition, lighting, and overall health can influence the onset of egg production. Providing a balanced diet, appropriate lighting conditions, and a comfortable environment can help encourage earlier and consistent egg laying.
What should I do if a chicken becomes broody in the laying cage?
Broodiness is a natural behavior in chickens where they exhibit a strong desire to sit on and hatch eggs. In a laying cage, broodiness can disrupt the egg-laying cycle. To address broodiness, you can try the following methods:
– Collect eggs frequently to discourage the hen from accumulating a clutch.
– Provide a comfortable and separate area with nesting materials for broody hens to encourage them to brood in a designated space.
– Gently and carefully break the broody behavior by removing the hen from the nesting area and redirecting her attention to other activities.
How can I protect my chickens in the laying cage from extreme weather conditions?
To protect your chickens from extreme weather conditions, ensure that the laying cage is properly insulated and ventilated.
In hot weather, provide shade, access to fresh water, and adequate ventilation to prevent overheating. During cold weather, insulate the cage with appropriate materials, provide bedding for warmth, and consider using heat lamps or heaters if necessary.
Regularly monitor the temperature and adjust the environment accordingly to keep your chickens comfortable and safe.
Can I use artificial lighting to increase egg production in the laying cage?
Yes, artificial lighting can be used strategically to stimulate egg production in laying chickens.
By providing additional hours of light, you can simulate longer daylight periods and encourage consistent egg laying, especially during the winter months when natural daylight hours are shorter.
Consult with a poultry expert or veterinarian to determine the appropriate lighting schedule and duration for your specific flock.
How often should I inspect the chicken laying cage for signs of damage or wear?
Regular inspections of the chicken laying cage are crucial to identify and address any signs of damage or wear. It is recommended to inspect the cage at least once a month or more frequently if possible.
Look for any loose or broken parts, weak spots in the fencing, signs of predator activity, or general wear and tear. Promptly repair or replace any damaged components to maintain the structural integrity and security of the laying cage.
These FAQs and detailed answers provide valuable information on common concerns related to chicken laying cages. By understanding these aspects, you can ensure the well-being of your flock and create an optimal environment for their egg-laying success.
Wrap Up
Constructing a well-designed chicken laying cage is the key to unlocking maximum egg production and ensuring the welfare of your flock. By following the guidelines and strategies outlined in this article, you’ll be equipped with the knowledge and tools necessary to build a successful and efficient poultry farming operation.
Remember to provide your chickens with a comfortable and secure environment, prioritize their nutrition and health, and implement proper maintenance practices. With dedication and attention to detail, your chicken laying cage will become the backbone of a thriving egg business.
Thank you very much for reading How To Make A Chicken Laying Cage, hopefully useful.

