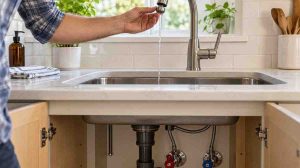
A leaking kitchen faucet does not always mean the same thing is broken. Water dripping from the spout, seeping around the handle, pooling at the faucet base, or appearing under the sink can point to different parts and require different repairs. Before taking the faucet apart, first identify exactly where the water is coming from. That one check can help you avoid replacing the wrong washer, O-ring, cartridge, hose, or even the entire faucet.
First, Find Where the Faucet Is Leaking
Before reaching for a wrench, dry the faucet, sink deck, and cabinet area with a towel. Then turn the water on and watch where moisture first appears. The location of the leak usually gives you the best clue about which component needs attention.
Water Dripping From the Spout
If water continues to drip from the spout after the faucet is turned off, the problem is usually inside the faucet body. Depending on the faucet design, a worn washer, cartridge, valve seat, O-ring, or ceramic-disc component may no longer be sealing properly.
This is the type of leak most people mean when they describe a dripping faucet.
Water Leaking Around the Handle
Water that appears around the handle while the faucet is running often points to a worn O-ring, cartridge seal, packing nut, or another seal inside the handle assembly.
Watch the handle closely while turning the faucet on and off. If the area stays dry when the faucet is off but becomes wet during use, the leak is likely connected to the handle assembly rather than the spout.
Water Pooling Around the Faucet Base
Moisture around the base of the faucet can come from deteriorated seals, loose mounting components, or water traveling down from another part of the faucet.
Dry the entire sink deck first. Then run the faucet without splashing water around the sink. If moisture slowly reappears at the base, inspect the faucet seals and mounting area before assuming the sink itself is leaking.
Water Appearing Under the Sink
A wet cabinet does not automatically mean the faucet cartridge is leaking.
Check the hot- and cold-water supply connections, shutoff valves, faucet hoses, pull-down hose connections, and the underside of the faucet body. Use a dry paper towel around each connection to help identify where moisture first appears.
If the leak is coming from a supply line or connection beneath the sink, repairing the faucet cartridge will not solve the problem.
For a broader inspection beyond the faucet itself, see our guide to water leak prevention around sinks, dishwashers, and supply lines, including the connections and hidden leak points that can cause water damage beneath the kitchen sink.
Pull-Down or Pull-Out Faucet Hose Leaks
For faucets with a pull-down or pull-out sprayer, extend the hose and run the water while watching the hose, spray-head connection, and quick-connect fitting under the sink.
Leaks in these areas may require tightening a connection, replacing a washer, or replacing the damaged hose rather than disassembling the faucet valve.
Quick rule: locate the leak first, identify the faucet type second, and only then decide which part needs to be removed or replaced.
Why a Small Kitchen Faucet Leak Matters
A faucet leak may look minor, but leaving it unresolved can waste water, stain sink surfaces, damage cabinet materials, and allow moisture to remain hidden around plumbing connections. The repair also becomes harder to diagnose if water spreads away from its original source.
The important first step is not simply stopping the visible drip. It is determining whether the leak originates from the faucet valve, handle seals, base, spray hose, supply line, or another connection. Once the source is clear, you can choose the correct repair instead of replacing parts at random.
According to the U.S. Environmental Protection Agency, household leaks can waste nearly 1 trillion gallons of water annually nationwide. Their Fix a Leak Week initiative offers practical advice for identifying and repairing common water leaks around the home. Learning from these expert-backed resources ensures your DIY repairs are not only effective but also environmentally responsible. For detailed insights and national statistics, visit the EPA’s Fix a Leak Week page.
🛠️ Tools and Materials You’ll Need
Do not buy replacement parts before you know which part is actually leaking. A dripping spout may require a cartridge, washer, valve seat, or ceramic-disc component, while a leak around the handle may involve an O-ring or seal. A leak beneath the sink may have nothing to do with the faucet valve at all and could come from a supply line, hose, or connection.
Start with basic tools for inspection and disassembly, then purchase the replacement part only after you have identified the faucet type and the failed component.
Before you begin, gather these items:
- Adjustable wrench
- Allen wrench (hex key)
- Flathead and Phillips screwdriver
- Plumber’s tape (Teflon tape)
- Replacement washer, O-ring, or cartridge
- Cleaning cloth or towel
- Bowl (to catch any residual water)
If you’re unsure about the internal parts of your faucet, consider bringing them to the hardware store to get an exact match.
Before You Start the Repair
By this point, you should already know where the leak is appearing. The steps below are mainly for leaks caused by components inside the faucet, such as a worn washer, O-ring, cartridge, valve seat, or seal.
If the water is coming from a supply hose, shutoff valve, pull-down hose, or another connection under the sink, do not disassemble the faucet valve unnecessarily. Repair or replace the leaking connection instead.
If the leak is coming from the faucet itself, continue with the steps below.
🚰 Step-by-Step: How to Fix a Leaking Kitchen Faucet
Step 1: Turn Off the Water Supply
Look beneath the sink for the hot- and cold-water shutoff valves. Turn both clockwise until they are closed, then open the faucet to release pressure and confirm that the water has stopped.
If water continues to flow, make sure both valves are fully closed. If a shutoff valve is stuck, heavily corroded, or begins leaking when you turn it, do not force it. Shut off the home’s main water supply before continuing or have the faulty valve repaired first.
Once the water is off, leave the faucet open for a few seconds to drain any remaining water from the lines.
Step 2: Plug the Drain
Use a sink stopper or a clean rag to block the drain before removing any faucet parts. Small screws, clips, washers, and O-rings can easily fall into the drain during disassembly.
It is also a good idea to place a towel over the sink basin and keep a small container nearby for removed parts. Arrange the pieces in the order you take them out so reassembly is easier later.
Identify Your Faucet Type Before Disassembly
Knowing the faucet type helps you understand what is inside the valve and which replacement part you may need. If you know the manufacturer and model number, use that information as your first reference because faucet designs can vary even within the same general type.
Here are the four common designs you may encounter:
- Compression faucet: Usually has separate hot and cold handles that tighten down as you turn them off. These commonly use rubber washers and valve seats.
- Cartridge faucet: May have one or two handles and usually operates with a smooth up-and-down or turning motion. A replaceable cartridge controls the water flow.
- Ball faucet: Typically uses a single lever mounted over a rounded cap. Inside is a ball assembly along with seals and springs.
- Ceramic-disc faucet: Usually has a single lever and uses ceramic discs inside a cylinder to control water flow. These faucets often have a smooth, short handle movement.
Do not rely on appearance alone when ordering replacement parts. If possible, identify the faucet brand and model or compare the removed component with the manufacturer’s replacement-part information.
Step 3: Disassemble the Faucet
Before removing internal parts, identify your faucet type and take a quick photo of the handle and valve assembly. Faucet construction varies, so the exact order of parts may differ between models.
For most kitchen faucets:
- Remove the decorative cap or handle cover, if present.
- Loosen the handle screw with the appropriate Allen key or screwdriver.
- Lift off the handle carefully.
- Remove the retaining nut, clip, bonnet, or other hardware that holds the cartridge or valve assembly in place.
- Place each removed part in order so you can reinstall it correctly.
Do not force a component that will not move. Mineral buildup can make older parts difficult to remove, and excessive force may damage the faucet body. If you can identify the brand and model, check the manufacturer’s parts diagram before removing unfamiliar clips or retainers.
Step 4: Inspect and Replace Damaged Parts
Inspect the removed components for flattening, cracks, tears, mineral buildup, corrosion, or other visible wear. The part that needs replacement depends on the faucet design and where the leak was appearing.
Pay particular attention to:
- Washers: Common wear points in compression-style faucets. A hardened, cracked, or misshapen washer may allow water to continue passing through the valve.
- O-rings and seals: Inspect them for flattening, splitting, or brittleness, especially if water was leaking around the handle or faucet body.
- Cartridges: A worn cartridge can cause dripping, leaking around the handle, or difficulty controlling water flow. If replacement is necessary, use the correct cartridge for the faucet brand and model.
- Valve seats and sealing surfaces: Check for mineral deposits, pitting, or damage that could prevent a new washer or seal from closing properly.
- Retaining clips and hardware: Make sure clips, nuts, and retainers are not bent, cracked, or excessively corroded.
When buying replacement parts, bring the old component with you or use the faucet’s brand and model number to confirm the match. Parts that look similar are not always interchangeable.
Before installing new O-rings or seals, clean away mineral deposits and debris from the surrounding surfaces. If the manufacturer recommends lubricant, use only a faucet-safe plumber’s grease suitable for the replacement part.
Do not replace several unrelated components simply because the faucet is already disassembled. Replace the part that matches the leak you diagnosed and any clearly damaged components you find during inspection.
Step 5: Reassemble and Test
Reinstall the faucet components in the reverse order you removed them. Make sure seals, cartridges, clips, and retaining nuts are seated correctly, but avoid overtightening plastic or threaded parts.
Once everything is back in place, close the faucet handle and slowly reopen the hot- and cold-water shutoff valves. Turning the water back on gradually can help you spot a problem before full pressure reaches the faucet.
Then test the faucet while checking the same location where you originally found the leak:
- Run both hot and cold water.
- Turn the faucet on and off several times.
- Check around the handle and faucet base.
- Look beneath the sink for moisture around supply lines, hose connections, and fittings.
- For pull-down faucets, extend and retract the hose while the water is running.
Dry the area and check it again after a few minutes. If the leak returns, confirm that the replacement part is the correct model and that seals or cartridges are installed in the proper position before replacing additional components.
If the faucet body itself is cracked, badly corroded, or a correct replacement part no longer solves the leak, replacing the faucet may be more practical than continuing to replace individual parts.
If replacement becomes the better option, our guide to choosing a kitchen sink faucet explains the main faucet styles, features, and practical considerations to review before buying a new one.
Why Fixing a Small Faucet Leak Is Worth It
A slow drip can seem insignificant, but household leaks add up quickly. The U.S. Environmental Protection Agency’s WaterSense program identifies dripping faucets as one of the common types of household leaks and reports that the average household can waste more than 9,300 gallons of water each year through leaks.
WaterSense also estimates that fixing easily corrected household leaks can save homeowners about 10 percent on their water bills.
Those figures apply to household leaks overall, not to a single kitchen faucet. Still, they show why it makes sense to investigate a persistent faucet leak rather than simply ignoring the drip.
Replacement Parts You May Need
Do not buy a faucet repair kit simply because it is labeled “universal.” The correct replacement depends on the faucet type, brand, model, and the component causing the leak.
Depending on what you found during diagnosis, you may need:
- Replacement cartridge: For a worn or damaged cartridge in a cartridge-style faucet. Match the replacement to the faucet manufacturer and model whenever possible.
- Washers: Common replacement parts in compression faucets. Match the diameter and thickness of the original washer.
- O-rings and seals: Used around cartridges, spouts, handles, and other moving connections. Replace them with the same size and material specified for the faucet.
- Valve-seat components: May be needed when the sealing surface is damaged or heavily worn.
- Pull-down or pull-out hose: Replace the hose if you confirmed that the leak is coming from the hose body or one of its dedicated connections.
- Supply line: If the leak is beneath the sink and originates from a damaged supply hose, replace the supply line rather than dismantling the faucet valve.
When possible, take the old part to the hardware store or use the faucet’s model number to find the manufacturer’s replacement-part specification.
Avoid buying multiple repair parts “just in case.” A correctly identified leak usually requires a much more targeted repair.
❓ Frequently Asked Questions
Can I fix a leaking kitchen faucet without turning off the water?
No. Shut off both hot- and cold-water supply valves before removing a handle, cartridge, washer, seal, or other internal component. After closing the valves, open the faucet briefly to confirm that the water has stopped and to release remaining pressure.
Why is my kitchen faucet still leaking after I replaced the cartridge?
First confirm that the cartridge is the correct model and is installed in the proper orientation. Also inspect the O-rings, seals, retaining hardware, and valve surfaces. If the original leak was actually coming from a hose, supply connection, or faucet base, replacing the cartridge may not address the real source.
Why is there water under my sink when the faucet is running?
Water beneath the sink may come from a loose or damaged supply line, shutoff valve, pull-down hose, hose connection, or the underside of the faucet body. Dry the area first, then run the faucet and use a dry paper towel around individual connections to identify where moisture first appears.
When should I call a plumber instead of repairing the faucet myself?
Consider professional help if a shutoff valve will not close, plumbing connections are badly corroded, the faucet body is cracked, water is leaking from piping rather than the faucet, or you cannot identify the source after basic inspection. Stop the repair if disassembly requires excessive force or risks damaging the plumbing.
Maintenance Tips to Prevent Future Leaks
A few simple checks can help you catch faucet problems before they become larger leaks:
- Do not overtighten the handle. Excessive force can put unnecessary stress on washers, cartridges, seals, and valve components.
- Clean mineral buildup when you see it. Deposits around the aerator, handle, or faucet base can interfere with normal operation and make leaks harder to diagnose.
- Check beneath the sink periodically. Look for moisture around supply lines, shutoff valves, pull-down hoses, and connection points before water damage becomes obvious.
- Watch for changes in handle movement. A handle that suddenly becomes stiff, loose, or difficult to control may indicate wear inside the faucet.
- Inspect hoses and supply lines for damage. Replace components that are cracked, kinked, corroded, or visibly leaking.
- Use the correct replacement parts. When a component eventually fails, match it to the faucet brand, model, and original part specification rather than replacing parts on a fixed schedule.
If you prefer a structured routine instead of relying on occasional checks, use our 12-month kitchen plumbing maintenance schedule to plan inspections of faucets, supply lines, drains, shutoff valves, and other leak-prone components throughout the year.
The best maintenance strategy is simple: pay attention to small changes, identify the source of a leak early, and repair the actual failing component before the problem spreads.
Wrap It Up
Fixing a leaking kitchen faucet starts with one simple question: where is the water actually coming from? A drip from the spout, moisture around the handle, water at the faucet base, and a leak beneath the sink can all point to different problems.
Once you identify the leak location and faucet type, you can inspect the correct component instead of replacing parts at random. In many cases, the repair may involve a washer, O-ring, cartridge, seal, hose, or supply connection rather than the entire faucet.
If the faucet is not leaking but the stream itself has become unusually weak, follow our low water pressure in kitchen faucet troubleshooting sequence instead. Low flow and leakage are different symptoms and require different diagnostic paths.
After the repair, test the same area where the leak originally appeared and check it again after a few minutes. If the source is still unclear, a shutoff valve will not close, plumbing is badly corroded, or the faucet body itself is damaged, professional repair may be the safer next step.