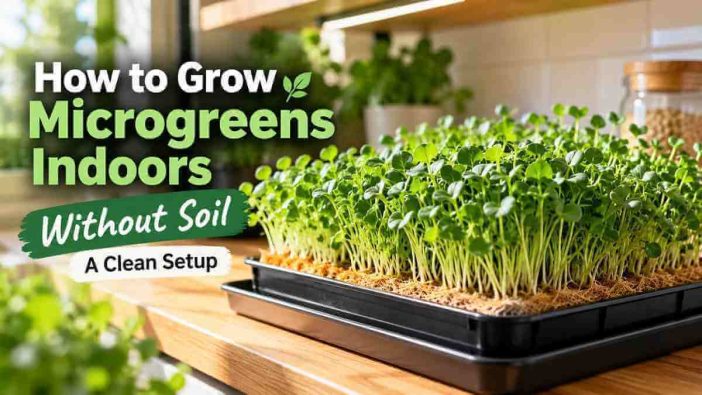
Most failed indoor microgreen trays are not caused by a lack of gardening skill. They usually fail because moisture, airflow, light, and seed density are treated as separate issues instead of one small growing system. This guide shows how to build that system without potting soil—and how to verify that it is working before mold, weak stems, or uneven growth take over.
A shallow tray on a kitchen shelf looks almost too simple to fail.
There is no garden bed to prepare, no deep container, and no plant to nurse for months. Yet a few days after sowing, the same tray can become either a dense canopy of green or a damp patchwork of stretched seedlings, empty spots, seed hulls, and suspicious white fuzz.
The difference is rarely one secret product.
Successful soil-free microgreens depend on a sequence: choose a medium that holds water without staying flooded, keep seeds in contact with that medium during germination, expose seedlings to adequate light at the right moment, then reduce leaf wetness while maintaining moisture at root level.
That is what makes this useful as an indoor growing system rather than just another seed-starting project.
Quick Answer: To grow microgreens indoors without soil, sow untreated microgreen seeds densely on a clean moisture-retaining mat such as hemp, jute, coco coir, or another food-suitable growing medium. Keep the seeds moist and covered during germination, then uncover them, provide strong light and airflow, switch primarily to bottom watering, and harvest with clean scissors when the crop reaches its appropriate microgreen stage.
Why Growing Microgreens Without Soil Works
Microgreens spend very little time in the tray compared with mature vegetables.
They are harvested while still young, after the cotyledons have developed and around the stage when the first true leaves begin to emerge. Depending on the crop and conditions, that can happen within roughly one to three weeks.
That short crop cycle changes what the root zone needs to do.
For a mature tomato or pepper plant, a growing medium must support a large root system for months. A microgreen mat has a narrower job: hold moisture, provide root contact, drain excess water, and stay structurally stable until harvest.
This is why shallow trays and fibrous growing mats can work.
It also explains why soil-free growing is attractive inside a kitchen or apartment. There is less loose potting mix to store, spill, dispose of, or accidentally cut into at harvest.
If you are still deciding whether microgreens deserve space in your kitchen, the existing HKM overview of microgreens benefits covers the broader role they can play in a small indoor food garden.
Choose the Growing Medium Before You Choose the Tray
The most important purchasing decision is not the tray color, a branded starter kit, or even the grow light.
It is the water behavior of the growing medium.
A useful medium must stay damp long enough for young roots while still allowing excess water and air to move through the system.
| Soil-free medium | Moisture behavior | Cleanup | Best use |
|---|---|---|---|
| Hemp or jute growing mat | Holds moisture evenly when properly wetted | Very clean | Repeatable countertop trays |
| Coco coir mat | Good moisture retention with more buffering than thin paper | Clean | Beginners who want a forgiving root zone |
| Purpose-made fiber pad | Varies by thickness and fiber | Clean | Small indoor systems |
| Plain paper towel | Dries faster and is easier to overwater | Very easy | Testing a small batch before buying equipment |
| Reusable food-suitable mesh or silicone mat | Low water storage; depends more on reservoir contact | Very clean after washing | Experienced users seeking reusable components |
University of Maryland Extension specifically notes that microgreens can be grown on mats made from materials such as hemp, wood fiber, coconut coir, bamboo, or jute, and also describes reusable silicone mats.
The practical difference is not simply “soil versus no soil.” It is buffered moisture versus precise moisture management.
A thick fibrous mat gives you more margin for error. A thin paper towel may work for experimentation but can move from dry to saturated surprisingly quickly.
Do not improvise with unknown craft materials
A sheet that looks like felt is not automatically appropriate for edible crops.
Avoid materials with unknown dyes, fragrances, adhesives, surface treatments, or manufacturing residues. A purpose-made growing mat or a product with clearly identified materials is easier to evaluate than random craft fabric.
For edible plants, “it absorbs water” is not a sufficient safety standard.
The Simple First-Tray Setup
You do not need a rack full of equipment.
For the first tray, use:
- A shallow tray or food-suitable growing container.
- A second solid tray or saucer underneath for bottom watering.
- A food-suitable hemp, jute, coir, or similar growing mat.
- Seeds sold for microgreens or untreated seed suitable for edible production.
- Clean drinking-quality water.
- A spray bottle for germination.
- Strong window light or an LED/fluorescent grow light.
- A simple timer if using artificial light.
- Clean scissors for harvest.
- Optional small fan if the growing area has poor natural air movement.
Penn State advises using high-quality seed that has not been chemically treated or coated, with seed specifically marketed for sprouts or microgreens being the easier food-safety choice.
If soil-free growing interests you because you want to understand other water-based systems, HKM’s introduction to growing hydroponically for beginners provides the broader context. A microgreen tray, however, does not need to become a complicated pump-and-reservoir project.
Step 1: Clean the Tray Before You Add Anything
Start with an empty workspace.
Wash your hands. Clean the tray, lower reservoir tray, measuring tools, and scissors. If a tray has previously held plants, remove old roots and organic residue before reusing it.
This is especially important with microgreens because warmth and moisture help seeds germinate—but those same conditions can also support unwanted microbial growth.
Penn State’s food-safety guidance emphasizes cleaning food-contact surfaces and tools before sanitizing them and keeping microgreen production equipment clean.
A clean first tray is easier to diagnose later. If something begins smelling sour or developing abnormal growth, you are not wondering whether last month’s roots are still hiding in a corner.
Step 2: Pre-Moisten the Mat, Then Remove Standing Water
Place the mat in the tray and wet it thoroughly.
Then pause.
The goal is not to create a miniature pond. The entire mat should feel evenly damp, but water should not be sitting above it.
This distinction matters throughout the crop cycle:
damp root zone ≠ flooded root zone
When a mat remains saturated and airless, you create a much harder environment for healthy roots and a much easier environment for decay.
If one corner dries while another stays submerged, correct the tray level before sowing. An uneven shelf can quietly create an uneven crop.
Step 3: Sow for Coverage, Not for a Mountain of Seeds
Microgreens are sown much more densely than full-size vegetables, but dense does not mean piled.
Spread seed evenly across the growing surface.
Aim for a consistent layer in which seedlings will eventually form a canopy without large areas of seed sitting several layers deep.
Seed size matters. Large seeds such as pea or sunflower behave differently from tiny brassica seeds, and some large or hard-coated seeds benefit from pre-soaking before sowing. Penn State notes that some larger-seeded species may be soaked before planting to accelerate germination.
Do not force every crop into one universal tablespoon-per-tray formula. Tray size, germination percentage, crop species, seed size, humidity, and season all affect a sensible seeding rate.
For a first tray, uniform distribution is more important than chasing maximum density.
Step 4: Create Good Seed-to-Mat Contact
After sowing, gently press the seeds against the moist surface.
You are trying to eliminate small air gaps, not crush the seed.
A second tray placed on top can help maintain humidity and contact during the early germination period. Certain larger-seeded crops may also be germinated under some weight, depending on the crop.
Keep the tray dark or covered during the initial germination phase when appropriate for the species.
University of Maryland notes that covering trays during germination helps retain warmth and humidity, while Penn State describes keeping microgreen trays dark for the first few days as a common germination technique.
Check the tray rather than following the calendar blindly.
When seedlings are actively lifting the cover and germination is broadly established, the crop is telling you it is ready for the next stage.
Step 5: Uncover the Tray and Treat Light as a Measurable Input
The crop changes quickly once the cover comes off.
Without adequate light, stems stretch toward the source, become pale, and produce an uneven canopy.
University of Maryland Extension says microgreens generally perform best under grow lights and gives about 16 hours of total light per day as a useful target. It also notes that 6–12 inches above foliage is typical, although actual distance depends on fixture intensity.
That last qualification matters.
A weak strip light and a powerful panel should not automatically be positioned at the same distance simply because both are sold as “grow lights.”
Use the manufacturer’s recommended coverage and hanging distance as your starting point, then watch the plants.
Signs that the lighting setup needs adjustment
If stems become long, thin, pale, or lean strongly in one direction, the canopy may not be receiving enough usable light.
If leaves bleach, curl, or dry unusually fast directly beneath a fixture, check whether the light is too intense or too close before assuming the plants need more water.
The useful metric is not how bright the lamp looks to you. It is whether the plants remain compact, evenly colored, and reasonably uniform across the entire tray.
A timer is one of the simplest upgrades because it makes the light cycle repeatable.
Step 6: Switch From Spraying Leaves to Feeding the Root Zone
Misting is convenient while seeds are germinating.
Once roots have established, however, repeatedly soaking the canopy is usually unnecessary.
Place water in the lower tray and allow the mat to absorb moisture from below. This keeps the root zone supplied while reducing direct wetting of stems and leaves.
Both Penn State and University of Maryland emphasize careful moisture management, and bottom watering is specifically recommended as a way to reduce saturation and direct water contact with the crop.
Do not top up the reservoir automatically every morning.
Touch or lift the tray first.
A mat that is still evenly damp does not need to be flooded simply because the clock says it is watering time.
Step 7: Use Airflow to Control the Environment, Not to Dry the Crop Out
A dense tray creates its own humid microclimate.
That is useful during germination but becomes a liability if stale, moist air remains trapped around the stems after uncovering.
University of Maryland recommends good air circulation to discourage disease and notes that a gentle breeze can help keep air moving around dense plant growth.
You do not need to blast the tray with a powerful fan.
The goal is gentle air exchange.
If the room already has steady circulation, additional equipment may not be necessary. If the tray sits inside a closed shelf or still corner, a small fan on a low setting can make the environment more predictable.
Step 8: Harvest the Crop, Not the Root Mat
Microgreens are cut above the growing medium.
Do not pull the entire root system out and serve it as though you were growing sprouts.
Use clean, sharp scissors or a knife and harvest above the mat when the crop reaches the appropriate microgreen stage. University of Maryland describes harvesting after the true leaves have expanded; Penn State likewise describes cutting the seedlings above the growing medium.
Harvest only what looks and smells normal.
If a section is slimy, decomposing, or visibly contaminated, do not treat cutting around the suspicious area as an automatic safety fix.
A Better Way to Diagnose White Fuzz
One of the easiest ways for a beginner to panic is to uncover a tray and see white material around the seedlings.
Not every white structure is mold.
Young roots naturally produce fine root hairs, and those can look surprisingly fuzzy when a tray first comes out of blackout.
Use the whole pattern rather than one visual cue.
| What you see | More consistent with normal roots | More concerning |
|---|---|---|
| Location | Concentrated around root zones | Spreading over seed hulls, stems, or mat surface |
| Pattern | Fine, fairly uniform structures | Irregular web-like patches |
| Plant condition | Upright seedlings, normal smell | Collapsing seedlings, discoloration or decay |
| Environment | Damp but draining | Persistent standing water, stale air |
| Odor | Normal fresh/earthy crop smell | Sour, rotten, or otherwise abnormal odor |
This is why prevention is better than spraying a questionable tray with a home remedy.
First correct the system: excess water, dirty equipment, poor drainage, excessive density, or insufficient airflow.
The One-Tray Control Method
Before buying a rack, multiple lamps, nutrient bottles, and several kilograms of seed, run one controlled tray.
Record five checkpoints:
| Checkpoint | What to verify |
|---|---|
| Before sowing | Tray clean, mat evenly moist, no standing water |
| Germination | Seeds remain moist and have good contact with the medium |
| Uncovering | Germination is broadly established before full light begins |
| Growing stage | Canopy receives even light; roots stay moist; air moves gently |
| Harvest | Stems are firm, crop looks and smells normal, tools are clean |
This turns troubleshooting into evidence.
For example, if only the back half of every tray stretches, changing fertilizer is unlikely to solve the problem. The light footprint is a stronger suspect.
If one corner repeatedly develops decay, check whether that corner of the tray sits lower and collects water.
If germination is patchy before the lights even come on, investigate seed distribution, seed quality, and contact with the growing mat before adjusting the lamp.
That Observe → Adjust → Verify loop is far more useful than changing three variables at once.
Can You Grow Microgreens Without a Grow Light?
Yes, sometimes.
A bright window can provide enough light for a small crop, especially when daylight is strong and the tray is positioned well. Penn State notes that microgreens can be grown on windowsills and that artificial lighting can supplement natural light.
But window light changes with season, weather, building orientation, nearby trees, window coatings, and the distance between the tray and glass.
A grow light makes the system more repeatable. If you plan to run trays continuously, it is worth calculating the grow-light electricity cost from the fixture’s actual watts and daily runtime before scaling from one tray to several shelves.
For someone who wants a tray occasionally, a good window may be enough. For someone trying to maintain a continuous weekly harvest, consistent artificial lighting is easier to control.
When you do use artificial lighting, also check the distance between the grow light and canopy; moving the fixture changes intensity and coverage even when the timer and wattage stay exactly the same.
This is one reason microgreens fit neatly into the broader systems described in HKM’s guide to urban farming methods for limited spaces: productivity comes from managing the small space intentionally rather than simply adding more plants.
If artificial light becomes part of your regular tray cycle, use this guide to set a consistent grow-light schedule instead of changing the timer from one batch to the next.
Five Problems That Reveal Which Variable Is Wrong
Seedlings are tall, pale, and leaning
Check light first.
Move the tray into stronger coverage, adjust fixture distance according to the light’s specifications, and make sure the entire tray—not only its center—receives useful illumination.
The mat dries out every few hours
The medium may be too thin, airflow may be excessive, the room may be unusually warm, or the tray may lack enough water-buffering capacity.
Before watering more often, consider whether a thicker coir, hemp, or jute medium would create a more stable root zone.
The tray stays wet for days
Reduce watering.
Check drainage, tray level, airflow, and whether the medium is sitting in standing water.
Do not treat permanently saturated media as desirable simply because microgreens have shallow roots.
Germination is strong in one area but poor in another
Look at seed distribution and contact.
Uneven mat moisture, uneven pressure from the cover, or a sloped tray can produce the same pattern repeatedly.
Mold-like growth keeps returning
Do not start by buying another spray.
Reset the system.
Clean the equipment, verify seed quality, lower unnecessary leaf wetness, avoid stagnant water, reduce excessive density where appropriate, and improve air circulation.
If the same failure returns after those controls are corrected, replace the questionable growing material and seed batch rather than carrying the problem from one tray to the next.
Food Safety Matters More When the Crop Is Eaten Raw
Microgreens are commonly consumed raw, so a clean growing system is part of the crop—not an optional housekeeping step.
Use clean water. Choose untreated seed suitable for edible production. Keep trays, scissors, hands, and working surfaces clean. Avoid media containing questionable biological material or untreated animal manure.
Penn State’s microgreen food-safety guidance specifically identifies water quality, worker hygiene, clean equipment, seed/substrate sourcing, and sanitation as important risk-control areas.
For a household grower, this does not require turning the kitchen into a laboratory.
It means avoiding obvious contamination routes and refusing to treat abnormal-smelling or decaying produce as salvageable simply because the crop was inexpensive.
What to Reuse and What to Replace
The tray is a durable part of the system.
Wash it thoroughly after harvest and clean it before planting again. University of Maryland specifically recommends washing and reusing trays and containers after a crop.
A heavily rooted disposable fiber mat is different.
Once roots are woven through hemp, jute, paper, or similar disposable material, replacing that mat usually gives the next crop a cleaner and more predictable start.
Reusable silicone or mesh systems can be reused when designed for that purpose, but their value depends on being able to clean them thoroughly.
Do not confuse “zero waste” with endlessly reusing a component that is difficult to sanitize.
Frequently Asked Questions
Do microgreens grown without soil need fertilizer?
Not every short-cycle home crop requires added fertilizer, particularly when it is harvested very young, but requirements differ by species, medium, water quality, and growing duration. For a first tray, keep the system simple and follow seed or growing-medium guidance before adding nutrients that introduce another variable.
Can I grow microgreens on paper towels?
Paper towels can work for small experimental batches because they hold enough moisture for germination, but they provide less moisture buffering than a purpose-made fibrous mat. Use plain, food-suitable material, prevent standing water, and expect to monitor moisture more closely as the seedlings grow.
How long do indoor microgreens take to grow?
Many microgreens reach harvestable size in roughly 7–21 days, depending on species and growing conditions. The crop stage matters more than a fixed calendar date: harvest when seedlings have reached the appropriate microgreen stage rather than automatically cutting every variety on the same day.
Should I mist microgreens every day?
Not necessarily. Misting is especially useful during germination, when roots are not yet established. Later, bottom watering can supply moisture to the root zone without repeatedly wetting the canopy. Check the actual moisture of the growing medium rather than watering automatically according to a daily schedule.
Start With One Tray, Then Scale the System
Learning how to grow microgreens indoors without soil is less about finding a perfect kit and more about making four variables predictable: moisture, light, airflow, and cleanliness.
Get one tray right first.
Learn how quickly your chosen mat dries. Watch where the light actually reaches. Notice whether one corner collects water. Record when the cover comes off and how the plants respond.
Once those variables behave predictably, adding a second tray is simple.
Adding ten trays before you understand the first one only multiplies the same mistake.
And if microgreens turn into a gateway to growing more food indoors, HomeKitchenMagazine’s guide to growing herbs indoors is the logical next step from a seven-to-twenty-one-day crop toward a longer-lived kitchen garden.