The ruler is usually the first tool people reach for.
A grow light hangs above a shelf. The highest monstera leaf sits somewhere beneath it. You measure eighteen inches, compare that number with a chart online, and assume the setup is finished.
Then the plant creates a contradiction.
Leaves in the middle look fine. Stems at the edge lean toward the lamp. A shorter pothos receives almost none of the strongest beam, while the top leaf of a taller plant sits much closer than it did two weeks ago.
The ruler was not useless.
It was simply measuring only one part of the system.
Grow-light distance changes intensity, coverage, heat exposure, and the amount of light reaching different parts of the canopy. That is why two lights positioned at the same height can produce completely different results.
The right question is therefore not only:
How far should the light be?
It is:
At this distance, what is the fixture actually doing to the plant?
How Far Should Grow Lights Be From Indoor Plants?
University of Minnesota Extension gives useful starting distances for common indoor-growing situations:
| Growing situation | Starting distance from light |
|---|---|
| Seedlings | 4–6 inches |
| Hydroponic lettuce and herbs | 6–12 inches |
| Foliage houseplants | 12–24 inches |
| Flowering houseplants | 6–12 inches |
These are starting ranges rather than universal installation rules. University of Minnesota also emphasizes that light intensity decreases with increasing distance and that fixture type matters.
Iowa State University Extension gives another useful fixture-oriented reference: fluorescent fixtures generally need to remain roughly 6–12 inches from foliage, while LEDs can often be 12–24 inches away. It also advises installing purpose-made grow lights according to the manufacturer’s directions.
Those two sets of recommendations reveal something more important than any individual number:
plant type and fixture type both matter.
A 20-watt desktop LED bar is not interchangeable with a large high-output panel simply because both are described as “LED grow lights.”
Measure From the Light to the Canopy, Not the Pot
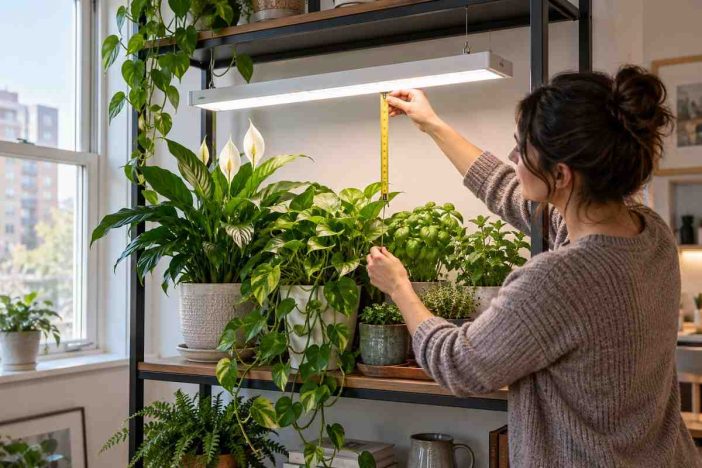
Grow-light distance should normally describe the gap between the light-emitting surface and the foliage receiving the light.
Do not measure from:
- the ceiling,
- the shelf above the plant,
- the lamp stand,
- the floor,
- or the top of the pot.
Measure to the highest relevant leaf surface.
This becomes especially important with tall or uneven plants.
A grow light that is 20 inches above the pot rim might be only eight inches above the top leaf of a mature plant.
As the plant grows, the distance changes even though the lamp never moves.
Mixed-height shelves create a hidden problem
Suppose one shelf contains:
- a tall monstera,
- a medium pothos,
- three small herb pots,
- and a newly started seedling tray.
One fixed lamp height cannot place all four canopies at the same distance.
Instead of lowering the entire fixture until the shortest plant receives enough light, use stable risers beneath shorter pots when appropriate.
That keeps the canopy more level and prevents the tallest plant from being pushed unnecessarily close to the fixture.
Distance Controls More Than Brightness
Moving a grow light changes several things simultaneously.
Intensity changes
A closer fixture generally delivers more light to the leaves.
Moving it farther away generally reduces the intensity reaching the canopy.
Iowa State Extension specifically notes that fixture distance can significantly influence Daily Light Integral, or DLI, because it changes how much usable light reaches the plant.
Coverage changes
Closer is not automatically better.
Lowering a directional light may increase intensity in the middle while shrinking the evenly illuminated footprint.
That can create a shelf where:
- the center plant receives strong light,
- plants near the edges lean inward,
- lower leaves remain shaded,
- and much of the collection experiences very different conditions despite sharing one lamp.
Raising the fixture often spreads light across a wider area—but with lower intensity.
So the best mounting height is not necessarily the one that produces the brightest center point.
It is the position that delivers useful, reasonably even light across the foliage you intend to illuminate.
Heat can matter
Modern LEDs usually operate much cooler than older high-intensity lighting, but fixtures still produce heat.
Heat becomes more relevant when:
- the fixture is enclosed,
- leaves almost touch the housing,
- airflow is poor,
- or the lamp includes electronics that become warm during long operating periods.
Always respect the manufacturer’s minimum clearance and installation instructions.
Why Wattage Cannot Tell You the Correct Distance
A common shortcut sounds reasonable:
“My light is 40 watts, so how many inches away should it be?”
Unfortunately, electrical wattage cannot answer that question by itself.
Watts tell you how quickly the fixture consumes electrical power.
They do not directly tell you:
- how efficiently it converts electricity into usable light,
- how the diodes are arranged,
- the beam angle,
- reflector or lens design,
- illuminated footprint,
- PPFD at a specific height,
- or uniformity across the canopy.
Two 40-watt lights can therefore behave differently at exactly the same distance.
If the manufacturer publishes a PPFD map or hanging-height chart, use that before a generic wattage chart.
Your existing daily schedule matters too. A plant receiving moderate intensity for fourteen hours has a different daily light exposure from the same plant receiving that intensity for six hours.
If duration is the unresolved variable, use the daily grow-light schedule rather than trying to compensate for every problem by moving the fixture.
Do Not Use the Inverse-Square Law as an Exact Household Calculator
You may see advice claiming that doubling grow-light distance always reduces intensity to exactly one-quarter.
That relationship comes from the inverse-square law and is useful for understanding a basic principle:
light intensity can fall rapidly as distance increases.
But a household grow light is not always an ideal point source radiating uniformly into open space.
Real fixtures can include:
- long LED bars,
- large diode panels,
- lenses,
- reflectors,
- multiple emitters,
- nearby walls,
- and overlapping beams.
Those factors change the actual intensity pattern.
Use the inverse-square concept to understand why distance matters—not to manufacture a precise PPFD number for a fixture you have never measured.
A real PPFD map or canopy-level measurement is more useful.
The Canopy Distance Calibration Method
Here is a safer way to establish grow-light distance without pretending one number works for every fixture.
Step 1: Check the manufacturer’s guidance
If the fixture provides:
- hanging-height recommendations,
- a PPFD chart,
- a coverage map,
- or dimmer guidance,
start there.
Purpose-made fixtures should not be ignored in favor of a generic internet chart.
Step 2: Use an extension range as a reasonableness check
If meaningful fixture data is unavailable, use the plant and fixture ranges above as a conservative starting framework.
For a foliage houseplant under a typical LED, that might place you somewhere around 12–24 inches from the foliage.
That is the beginning of calibration, not the end.
Step 3: Measure to the highest leaves
Record the actual canopy distance.
If several plants share the light, note both:
- the closest foliage,
- and the shortest plant that still needs useful illumination.
Step 4: Check the center and edges
Do not evaluate only the leaf directly beneath the brightest point.
Look across the entire illuminated footprint.
A useful fixture position should not create one excellent center plant surrounded by several light-starved ones.
Step 5: Keep the timer stable
Do not change distance and duration simultaneously unless there is an obvious safety problem.
If the timer changes at the same time as the fixture height, you will not know which adjustment produced the plant’s response.
Step 6: Watch new growth
Old leaves record old conditions.
New growth tells you more about the current setup.
Look for:
- stem spacing,
- direction of growth,
- leaf size,
- coloration,
- bleaching,
- scorching,
- and whether growth remains reasonably balanced across the canopy.
Step 7: Adjust one variable
If the evidence points toward insufficient intensity, move the fixture closer in a controlled increment or increase output if it is dimmable.
If the evidence points toward excessive intensity, increase the distance or reduce output.
Then observe again.
This Measure → Observe → Adjust → Verify approach produces much more useful information than repeatedly moving the lamp because a single leaf looks different.
Signs a Grow Light May Be Too Far Away
A weak-looking plant does not automatically prove the lamp is too far away.
Watering problems, roots, temperature, pests, and nutrition can also affect growth.
But low light becomes a stronger suspect when several symptoms align.
University of Maryland Extension identifies weak, spindly growth and stretching toward a light source as common signs of inadequate light.
Check for patterns such as:
| Pattern | What it can suggest |
|---|---|
| New stems elongate toward the fixture | insufficient useful light |
| Large gaps develop between new leaves | intensity may be too low |
| Plants at shelf edges lean toward the center | poor coverage |
| New leaves remain unusually small | inadequate light may be one factor |
| A plant near the window performs better than an identical plant deeper in the room | light environment deserves investigation |
If the fixture is already running for an appropriate number of hours, adding even more hours may not be the best first fix.
Moving or improving the light may make more sense.
Signs a Grow Light May Be Too Close
Too much light can produce a different spatial pattern.
University of Maryland Extension notes that excessive light can contribute to pale, bleached or faded areas that may later become brown and brittle.
Look especially at the leaves closest to the fixture.
Possible clues include:
- bleaching near the upper canopy,
- faded coloration,
- curling near the brightest area,
- crisp or scorched-looking patches,
- damage concentrated directly beneath the fixture,
- or stress appearing after a substantial increase in light intensity.
Do not diagnose excessive light from one brown leaf.
A brown edge can also result from watering, humidity, salts, roots, or physical damage.
The location of the symptoms matters.
If only the foliage closest to the lamp is affected while lower or outer foliage looks normal, fixture intensity becomes a more plausible explanation.
Lower the Light or Increase the Runtime?
These two adjustments solve different problems.
Moving a fixture closer primarily increases instantaneous intensity at the canopy.
Running it longer increases duration.
They interact, but they are not interchangeable.
If your plant is receiving weak light for fourteen hours, extending the timer to sixteen hours may still leave it under weak light.
If the fixture is already intense and too close, reducing the timer slightly does not necessarily eliminate the midday-style hotspot while the lamp is on.
Use distance to solve an intensity/coverage problem.
Use the timer to solve a daily-duration problem.
The full timing framework is covered separately in our grow-light hours guide.
Raise the Fixture or Use the Dimmer?
A dimmer gives you another control.
Suppose a broad plant shelf receives good coverage when the lamp hangs 20 inches above the canopy, but the center is receiving more intensity than you want.
You have two main choices.
Raise the light
This generally:
- reduces intensity,
- increases the illuminated footprint,
- and can improve uniformity across a wider shelf.
But raise it too far and the whole canopy may become under-lit.
Dim the light
This:
- reduces fixture output,
- maintains the same physical geometry,
- and can preserve an existing coverage pattern.
That makes dimming useful when the height already distributes light well.
There is no universal rule that dimming is better than raising.
Use the problem itself to decide:
coverage problem → reconsider height and fixture geometry
excess intensity with good coverage → dimming may be cleaner
A Light Meter Can Reduce Guesswork
You do not need specialist equipment to keep ordinary houseplants alive.
But measurement becomes more valuable when:
- many plants share one fixture,
- you are growing herbs or seedlings,
- the lamp is expensive,
- distance recommendations conflict,
- or you want to compare several positions objectively.
Iowa State Extension notes that smartphone applications can provide measurements such as lux, PPF or PPFD with accuracy adequate for a typical home gardener, provided the app or meter is set correctly for the light source and measurements are taken at foliage level.
The key phrase is at foliage level.
Do not measure the brightness at the lamp and assume the plant receives the same thing.
Measure where the leaves actually sit.
For a broad shelf, check more than one point.
Center-only readings can hide weak edges.
Distance Matters for Indoor Herbs Too
Culinary herbs generally require more useful light than many shade-tolerant foliage houseplants.
University of Minnesota gives 6–12 inches as a starting range for hydroponic lettuce and herbs under supplemental lighting.
But again, fixture output determines whether that range makes sense for your actual lamp.
If basil continues stretching despite a long timer schedule, investigate fixture distance and strength before assuming the plant needs fertilizer.
Our guide to growing herbs indoors covers the broader watering, potting, pruning, and care system around that lighting decision.
What About Seedlings and Microgreens?
Seedlings can expose a weak-light setup quickly.
When intensity is insufficient, young plants can stretch dramatically because they are trying to reach a stronger light environment.
University of Minnesota gives roughly 4–6 inches as a starting distance for seedlings, while University of Maryland notes that microgreens are commonly grown with lights roughly 6–12 inches above the foliage, depending on fixture intensity.
Those different ranges are not evidence that one university is wrong.
They describe different growing situations.
That is exactly why the fixture and crop must remain part of the answer.
For microgreens specifically, our soil-free microgreens setup explains how lighting interacts with airflow, moisture, seed density, and tray management.
Low-Light Plants Still Need Enough Light
“Low light” does not mean darkness.
Snake plants, pothos, ZZ plants and several other foliage species tolerate dimmer indoor conditions better than high-light crops, but a decorative lamp several feet away may still contribute very little useful light.
Before buying a larger fixture for a naturally dim room, it may make more sense to choose from indoor plants for low light and match the plant to the location.
Equipment should solve a real mismatch.
It should not automatically compensate for every plant being placed in every room.
Distance Also Changes the Value of the Electricity You Buy
Moving a fixture does not change its electrical wattage.
But it can change how much of the light you are paying for actually reaches your plants.
A 40-watt lamp can consume the same amount of electricity whether:
- its beam covers the canopy efficiently,
- half the output lands on a wall,
- or the lamp sits so far away that very little useful intensity reaches the leaves.
That is why operating cost and physical placement belong in the same system.
Our grow-light electricity cost guide explains how to convert actual fixture watts and timer hours into monthly kWh and running cost.
The objective is not merely to reduce electricity use.
It is to avoid paying for light that misses the plants.
Grow-Light Placement Checklist
Before deciding that your plant needs a different fixture, check the setup in this order:
- Confirm the plant’s general light requirement.
- Check the manufacturer’s recommended hanging height.
- Measure from the emitting surface to the highest leaves.
- Check whether shorter plants sit much farther from the fixture.
- Evaluate both center and edge coverage.
- Keep the timer consistent while testing distance.
- Look at new growth, not only old damage.
- Move the light or adjust output one variable at a time.
- Recheck the distance as plants grow.
- Keep electrical connections secure, dry, and installed according to the fixture instructions.
A ruler gets you started.
The plant tells you whether the number works.
Frequently Asked Questions
How far should an LED grow light be from houseplants?
For many foliage houseplants, 12–24 inches from the foliage is a useful starting range, but the fixture manufacturer’s hanging-height or PPFD guidance should take priority. A small LED bar and a high-output panel can require very different distances even if both are marketed for indoor plants.
Can a grow light be too close to an indoor plant?
Yes. Excessive intensity can contribute to pale or bleached areas, curling, or scorched tissue, especially near the upper canopy. However, those symptoms can overlap with other problems. Look for damage concentrated nearest the fixture and change one variable at a time before drawing conclusions.
Where should I measure grow-light distance from?
Measure from the light-emitting surface to the relevant plant canopy, usually the highest leaves receiving the strongest light. Do not measure from the ceiling, shelf, floor or pot rim. Recheck the gap as a plant grows because the effective distance can change even when the fixture stays fixed.
Is it better to raise a grow light or dim it?
That depends on the problem. Raising the fixture generally reduces intensity while spreading light across a wider footprint. Dimming reduces output without changing the physical coverage geometry. If coverage is already good but intensity is excessive, dimming may be useful; if coverage is uneven, fixture height deserves attention.
Use Distance as a Control, Not a Rule
The most useful answer to how far should grow lights be from indoor plants is not one universal measurement.
Start with credible fixture instructions and research-backed ranges. Measure to the canopy. Check the center and edges. Keep the timer stable. Then let new growth tell you whether the setup needs adjustment.
For many foliage houseplants, 12–24 inches is a reasonable place to begin. Herbs, seedlings, and flowering plants can require closer placement. A stronger fixture may need more distance.
But the ruler is only the control.
Useful light reaching the leaves is the result that matters.