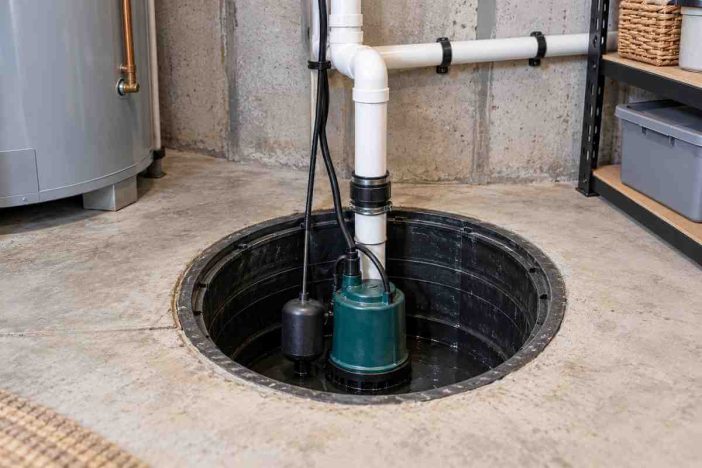
The basement is dry. The weather forecast is not.
Rain is expected overnight, the sump pit looks ordinary, and the pump is plugged in. There is no puddle to warn you, no alarm sounding, and nothing obviously broken.
It is tempting to call that reassuring.
But a sump pump spends much of its useful life waiting. The real question is not whether the unit looks ready or whether its motor can make noise. It is whether rising water can trigger the system, leave the basin through an unobstructed discharge path, stay outside the house, and stop without immediately flowing back.
That is what a useful test should prove.
Quick Answer: How Do You Test a Sump Pump?
The most useful homeowner test is a controlled full-cycle water test.
Before handling anything, inspect the accessible area for obvious electrical, physical, or water hazards. If access is safe and your pump manufacturer permits this testing method, slowly add clean water to the sump basin until the float rises enough to activate the pump.
Then verify that:
- The float moves freely.
- The pump starts automatically.
- The water level actually falls.
- Water reaches the discharge outlet.
- The pump stops automatically.
- Water does not immediately rush back and restart the cycle.
- Any backup pump, alarm, or monitoring system is tested separately according to its own instructions.
Do not use a universal number of gallons or a universal number of seconds as the definition of a passing test. Basin size, pump capacity, discharge height, pipe length, groundwater inflow, and system design vary considerably.
The goal is to confirm your system completes its intended cycle.
A working sump is only one layer of early water-damage prevention. It cannot compensate for blocked exterior drainage, failed plumbing, groundwater problems, or other moisture sources.
What a Real Sump Pump Test Should Prove
Many quick checks answer only one question:
Does the motor start?
That is useful, but incomplete.
A residential sump system has several links:
Water enters basin → float detects level → switch energizes pump → pump moves water → check valve limits backflow → discharge carries water away → pump switches off.
A failure anywhere along that chain can undermine the protection.
For example:
- A motor can run while a discharge line is blocked.
- A healthy pump can remain idle because a float is obstructed.
- Water can leave the basin and then fall back through a faulty or missing check valve.
- A pump can work perfectly until a storm causes a power outage.
- An exterior outlet can discharge water too close to the foundation, allowing part of the same water to return.
So instead of asking only whether the pump runs, ask:
Can the whole system move rising water out of the house and return to standby?
That is the standard used throughout this guide.
Before You Add Water: Define the Safe Boundary
Sump pits combine water and electrical equipment. A routine test should not turn into appliance disassembly.
For most homeowners, useful observations can be made without removing a pump, opening electrical components, dismantling a check valve, or touching wiring.
Stop before testing if you see an electrical hazard
Do not reach into the pit or handle cords, plugs, receptacles, switches, or equipment while standing in water.
Do not repeatedly reset:
- a breaker that keeps tripping;
- a GFCI that will not remain set;
- a pump that trips power whenever it starts.
Those are not normal test results.
If troubleshooting requires handling the pump, float, electrical connection, or internal components, follow the manufacturer’s shutdown instructions first or use a qualified professional.
Do not casually open a sealed radon sump
Some homes use the sump as part of a radon-control system.
In those installations, the lid may be intentionally sealed airtight around the basin, discharge pipe, wiring, or radon vent.
A sealed cover should not be treated like an ordinary removable lid simply because you want to pour in a bucket of water. Use an approved test or access opening if the system provides one, or obtain guidance appropriate to the radon system.
The U.S. Environmental Protection Agency notes that sump covers used for radon control need to remain airtight but still allow pump inspection and maintenance. If a seal is broken for service, it needs to be properly re-established afterward.
That detail is easy to miss in generic sump-pump advice.
How to Test a Sump Pump: The 7-Check Full-Cycle Test
1. Look Before You Touch
Begin with a visual inspection of everything you can safely see.
Check for:
- standing water where electrical components could become involved;
- loose or visibly damaged cords;
- a pump leaning or shifted out of position;
- sediment or debris around the float;
- disconnected-looking pipe sections;
- obvious pipe leaks;
- a damaged basin or lid;
- unusual corrosion;
- objects stored against accessible components.
If the basin is covered, do not assume you need to remove the cover. Follow the design of the installation and the pump manual.
A sump surrounded by boxes, extension cords, loose debris, or stored objects is harder to inspect and can be harder to service during an emergency.
2. Confirm the Float Has a Clear Path
The float switch tells the pump when the water level is high enough to start.
Its movement can be restricted by:
- the basin wall;
- the pump body;
- electrical cords;
- discharge piping;
- sediment;
- loose objects.
You do not need to manipulate a powered float by hand to determine whether the system works.
During the water test, watch the water rise and confirm that the float can travel through its normal operating range without catching on something.
If safe visibility is poor, do not reach blindly into a powered sump.
A float that cannot move is effectively a pump that does not know the basement is filling.
3. Add Clean Water Until the Pump Starts
If the manufacturer permits a water test, add clean water gradually.
Do not fixate on a “five-gallon rule.”
Some pits may need less water; others may need considerably more before the float reaches its activation point. The relevant threshold is the normal trigger level of your installation, not a bucket size borrowed from another house.
As the water rises, observe whether the pump starts automatically.
A pass here means:
rising water triggers the normal automatic control without manual intervention.
If the water approaches an unsafe level and the pump does not start, stop adding water.
Do not keep filling the basin simply to find out how high it can go.
4. Confirm That the Water Level Actually Falls
A motor sound is not enough.
Once the pump starts, watch the basin.
The water level should fall in a controlled manner.
This single observation verifies more than listening does because it shows that the pump is not merely energized—it is actually transferring water.
Watch for:
- water level that barely changes;
- unusually weak removal;
- grinding or harsh vibration;
- leaks around visible discharge connections;
- repeated starting and stopping while the basin remains high.
Current homeowner guidance from established plumbing and waterproofing companies also emphasizes confirming both activation and drainage, not merely motor operation.
If the pump runs but water remains in the pit, the possible causes are broader than “bad motor.” The intake, impeller, pipe, valve, discharge route, installation, or pump capacity may need professional evaluation.
5. Watch the Pump Shut Off
A complete test includes the end of the cycle.
As the water falls, the float should return toward its resting position and the pump should shut off automatically.
Now watch what happens next.
A small amount of water movement can be normal depending on the system. What deserves attention is substantial water returning down the discharge pipe, causing the level to rebound or forcing the pump into rapid repeated cycling.
That pattern can point toward a problem involving the check valve, discharge arrangement, incoming water volume, or another component.
Do not diagnose the valve from sound alone.
Record what you observe and compare it with the manufacturer’s expected operation.
6. Verify the Discharge Outside
This is the part many indoor-only tests miss.
When safely accessible, confirm that the water removed from the basin actually reaches the exterior discharge point.
Look for:
- visible discharge while the pump runs;
- an outlet blocked by leaves, soil, snow, ice, landscaping, or debris;
- a damaged or disconnected termination;
- water immediately pooling beside the foundation;
- water returning toward the house instead of moving away.
HomeServe’s maintenance guidance similarly recommends checking where test water exits and whether the discharge path is blocked or sends runoff back toward the home.
Do not enter flooded areas or handle outdoor electrical equipment in wet conditions to complete this check.
The objective is simple:
Water removed from beneath the basement should not be delivered back to the same problem area.
7. Test Backup, Alarm, and Notifications Separately
A primary pump test does not prove a backup system works.
If your installation includes a battery-powered secondary pump, backup controller, high-water alarm, or remote notification device, test each layer according to its own manufacturer instructions.
A useful backup test should determine whether the secondary system can actually respond under the condition it is intended to cover—not merely whether a battery indicator is illuminated.
Depending on the system, manufacturer procedures may involve:
- temporarily isolating the primary pump;
- raising the water level;
- confirming secondary-pump activation;
- verifying an audible alarm;
- verifying remote alerts;
- restoring the system to its normal configuration afterward.
Do not improvise this sequence if you do not know how the system is wired or powered.
Ready.gov includes a battery-backed sump pump among property-preparation measures homeowners can consider for flooding, which matters because severe rain and power interruption can occur together.
The HomeKitchenMagazine Full-Cycle Pass/Fail Framework
Use the test as a sequence rather than one yes-or-no result.
| Test phase | What a useful pass looks like | Warning sign | Next step |
|---|---|---|---|
| Visual condition | Accessible components look intact and unobstructed | Damage, loose connections, unsafe water/electrical condition | Stop if unsafe; arrange inspection |
| Float response | Rising water triggers pump normally | Pump does not start or float appears obstructed | Stop adding water; inspect professionally if needed |
| Pumping | Water level drops steadily | Motor runs but level stays high | Check for system restriction or service need |
| Shutoff | Pump stops as level falls | Continuous running or rapid restart | Evaluate float, inflow, check valve, discharge |
| Discharge | Water reaches safe outlet | No flow, weak flow, obstruction, water returning toward foundation | Investigate discharge route |
| Backup | Backup performs its intended test | Battery, secondary pump, alarm, or controller fails | Service before relying on it |
| Documentation | Result is recorded for comparison | No baseline or unknown system history | Start a maintenance record |
This is an editorial decision framework, not a manufacturer specification or plumbing code.
Its purpose is to prevent the common mistake of declaring the system healthy because one component made noise.
Do Not Judge a Sump Pump by Cycle Time Alone
It is tempting to search for a benchmark such as:
“A healthy sump pump should empty the pit in X seconds.”
That can create false confidence.
Cycle time depends on:
- pump capacity;
- vertical lift or head;
- pipe diameter;
- pipe length and fittings;
- basin volume;
- activation level;
- amount of water added;
- groundwater entering during the test;
- discharge conditions.
A better approach is to establish a personal baseline.
After a normal test, record:
- approximate starting water level;
- whether activation was immediate at the expected float level;
- approximate run duration;
- sound and vibration;
- how quickly the water level fell;
- how much water returned after shutoff;
- whether exterior discharge looked normal.
Future tests can then be compared with the same system.
A pump taking substantially longer than its own normal baseline deserves more attention than a pump simply failing to match an arbitrary internet number.
What a Failed Test May Mean
A homeowner test identifies symptoms. It does not necessarily diagnose the defective component.
| Observation | Possible explanations | Reasonable response |
|---|---|---|
| Water rises but pump never starts | Power problem, switch issue, obstructed float, pump failure | Stop adding water; check only safe, obvious conditions |
| Pump hums but little water moves | Restriction, pump problem, discharge issue | Stop repeated testing; arrange service |
| Pump starts only after interference with float | Float obstruction or control issue | Correct only safely accessible obstruction; otherwise service |
| Pump will not stop | Float/control problem, excessive inflow, installation issue | Do not allow prolonged dry running; investigate |
| Water rushes back after shutoff | Check-valve or discharge-system issue may be involved | Inspect/service discharge system |
| Water exits beside foundation and returns | Poor discharge termination or drainage | Redirect through an appropriate compliant solution |
| Backup does not activate | Battery, controller, wiring, pump, or test-procedure problem | Follow backup-system manual or obtain service |
| Breaker/GFCI repeatedly trips | Electrical fault or pump problem | Do not bypass protection; use qualified assistance |
These are possible causes, not remote diagnoses.
If the system behaves unpredictably, a plumber, waterproofing specialist, electrician, or other appropriate professional can determine which component is actually responsible.
How Often Should You Test a Sump Pump?
There is no good reason to invent one interval for every model.
Some manufacturer manuals call for monthly operational testing, particularly when the pump has not otherwise been running. Others specify their own periodic or seasonal maintenance schedule.
Use your exact manual as the primary schedule.
As a practical risk-based supplement, it can also make sense to verify operation:
- before a season of heavy rain;
- after a long dry period in which the pump has not cycled;
- after maintenance;
- after discharge piping has been altered;
- after a backup battery or controller has been replaced;
- after a freeze that could have affected an exposed discharge;
- after an unusual sound, alarm, or operating pattern.
Add the check to your essential home maintenance checklist rather than expecting to remember it when storms arrive.
Testing earlier gives you options.
Testing after water is already spreading across the basement floor does not.
Add Early Warning Around the Sump, Not Instead of Testing It
A water sensor near the sump pit can provide useful early warning if water rises beyond normal levels or escapes the basin.
That makes the sump area one of the logical locations considered in HomeKitchenMagazine’s guide to leak detection sensors.
But a sensor and a pump solve different problems.
The pump removes water.
The sensor tells you that water is somewhere it should not be.
One should not substitute for the other.
A stronger basement protection stack can include:
drainage + functional sump pump + backup where appropriate + water detection + a documented response plan.
That is layered risk reduction rather than dependence on one device.
When to Stop DIY and Call a Professional
A simple functional test is useful only while the conditions remain safe and observable.
Professional evaluation is appropriate when:
- the pump receives power but does not move water;
- the system repeatedly trips electrical protection;
- the discharge is inaccessible, frozen, buried, or suspected to be blocked;
- the pump cycles rapidly without an obvious reason;
- you cannot determine whether the check valve is working;
- sewage is involved;
- removing equipment is required;
- the basin is part of a sealed radon system you do not know how to restore;
- the backup system fails its prescribed test;
- basement water continues rising despite the pump operating.
A broader whole-home safety inspection can also help when sump problems appear alongside foundation moisture, plumbing deterioration, electrical concerns, or other maintenance risks.
Do not enter standing water around energized electrical equipment.
If flooding creates an electrical hazard, prioritize personal safety over saving stored property or completing a pump test.
Frequently Asked Questions
Can I test a sump pump by pouring water into the pit?
Yes, a controlled water test is a common way to verify automatic activation when the pump manufacturer allows it. Add clean water gradually until the float reaches its normal trigger level, then confirm the pump starts, lowers the water, discharges it, and stops automatically. Do not rely only on motor sound.
How much water should I use to test a sump pump?
There is no universal bucket size. Sump-basin dimensions, float position, pump installation, and existing water level differ between homes. Add only enough clean water to reach the system’s normal activation point, and stop if the level rises abnormally without the pump starting.
What if my sump pump runs but does not remove water?
Stop treating the running motor as proof that the system works. A restriction, discharge problem, pump issue, or another component may be involved. Avoid repeatedly running the pump without effective water movement and follow the manufacturer’s troubleshooting instructions or arrange appropriate professional service.
Should I test the battery backup at the same time?
The backup system should be tested too, but as a separate system and according to its own instructions. A successful primary-pump test does not verify the battery, backup pump, controller, high-water alarm, or notification system that may be needed if primary power or the main pump fails.
A Quiet Pump Is Not a Proven Pump
The most reassuring sump pump is not the one that sits silently in a dry basement.
It is the one whose complete operating cycle has been verified before it is urgently needed.
Raise the water under controlled conditions.
Confirm the float triggers the pump.
Watch the level fall.
Confirm the water actually leaves the house.
Watch the system shut off.
Then verify the backup and warning layers separately.
Document what normal looks like so the next test has a baseline.
That turns sump pump maintenance from a visual ritual into evidence that the basement’s drainage system can still do its job.
For the larger prevention system around it, continue with the Home Safety, Maintenance & Prevention hub.
Sources and Verification
Safety and maintenance guidance in this article was cross-checked against:
- U.S. Environmental Protection Agency (EPA) guidance concerning sealed sump covers and radon-control systems.
- Ready.gov / FEMA flood-preparedness guidance.
- Published sump-pump owner and installation guidance from manufacturers including Liberty Pumps and WAYNE.
- Current homeowner service guidance used only to compare common real-world testing workflows, not as a replacement for manufacturer instructions.
The instructions for the exact pump, controller, battery, alarm, and radon system installed in a home take precedence over generalized testing guidance.